Adding custom assets to Palworld
In this post, we will guide you step-by-step on how to add custom assets to Palworld. During our Palworld modding journey, asset swapping, which is the process of replacing existing assets with your own, came up repeatedly, and we decided to look into this. The articles we found were very helpful but not aimed at beginners and sometimes also not completely step-by-step. This post will go over the majority of information from https://pwmodding.wiki/docs/category/asset-swapping but will expand on it as well, making it more beginner-oriented.
If you enjoyed the information in this post and it helped you out, please show some support to the authors of the main source of information at https://pwmodding.wiki.
Prerequisites
Like many of our guides, we’re starting this one by checking our prerequisites. If you’ve read through our Modding Palworld – Part 1 Getting Started post, we have some good news: This guide isn’t quite as lengthy!
If at any point you seem lost or can’t figure out what to do next, feel free to contact us through the comments below the post or by visiting our Contact us page. We’ll get back to you!
We will go through the items in the list below and explain them step-by-step. If you already have specific items installed and configured correctly from the list below, feel free to skip the step.
- Step 1. Installing FModel
- Step 2. Installing Unreal Engine 5.1
- Step 3. Installing Blender
- Step 4. Installing io_scene_psk_psa
- Step 5. Exporting a Pal with FModel
- Step 6. Importing into Blender
- Step 7. Updating our model in Blender
- Step 8. Exporting from Blender
- Step 9. Importing our model into Unreal Engine
- Step 10. Exporting our model from Unreal Engine
Step 1. Installing FModel
Since we will edit an existing model in Palworld, we need a way to get our hands on said models. To do this, we will be using a tool called FModel. FModel is a tool used for exploring Unreal Engine assets. This tool will help us by examining and obtaining the required models and textures we will use.
You can download FModel by going to the following URL: https://fmodel.app/download. After downloading it, install it. You might notice that FModel requires you to install a .NET version during the installation. Just follow the installer’s instructions and you should be good to go.
After FModel is done installing, open it up and the following screen should greet you.
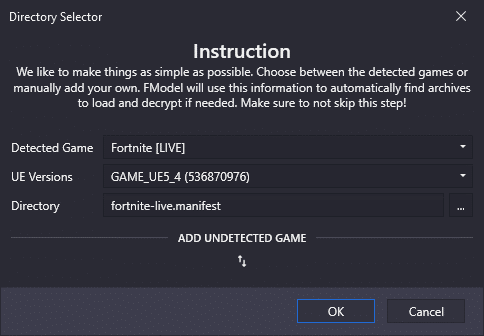
Next, click the vertical arrow icon under “ADD UNDETECTED GAME”. This will show two new fields, “Name” and “Directory”. For the name, we will fill in “Palworld” but this can be any name you’d like. As for the directory, we will select our Palworld installation directory. For us, this is “I\steamapps\common\Palworld”. If you’re unsure where to find your Palworld installation directory, you can right-click on the game in your Steam library and go to “Manage -> Browse local files”.
Navigating FModel
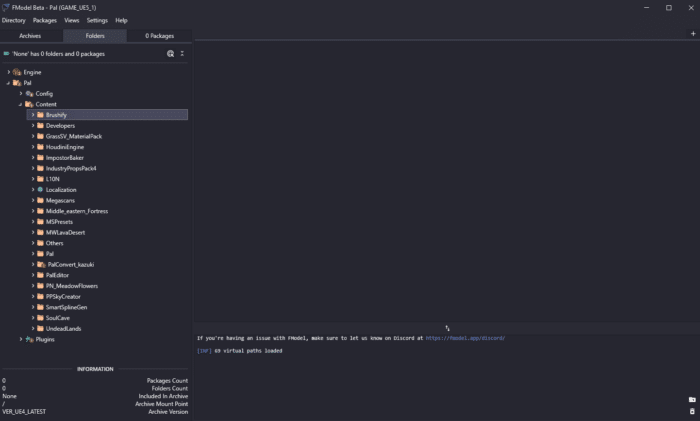
After you’ve selected the Palworld directory, don’t forget to press the blue “+” symbol to add the game to the list of FModel. In FModel, you can now double-click “Pal-Windows.pak”, and you’ll be brought to the folder structure, which should look like this.
We’re almost done setting up FModel. The next thing we need to do, is adjusting a couple settings. If you have opened your Palworld game into FModel, click on Settings in the top menu bar.
In the settings tab, you can assign a custom “Output Directory”. Next, under the “GAME” section, update “UE Versions” to “GAME_UE5_1. Under the “ADVANCED” section, check the checkbox for “Local Mapping File” and update the “Mapping File Path” to the mapping on your computer. You can find the most recent mapping with this URL: https://github.com/TheNaeem/Unreal-Mappings-Archive/tree/main/Palworld. Download the most recent one to your computer and select it through the “Mapping File Path” option. As of writing this post, this is “palworld-mappings-13312439.usmap”. Remember, that this is something you need to do when the game updates. So make sure you save the above URL!

After you’ve done this, select the “Models” tab on the left side of the settings screen and update the “Model Export Directory” to a path of your choice. Update the “Mesh Format” to “ActorX (psk / pskx)” and at the bottom, update “Texture Format” to “PNG”. Click “OK” to save your settings and FModel will restart.

Step 2. Installing Unreal Engine 5.1
Since we’re modding an Unreal Engine game, we must also install the engine. To install Unreal Engine 5, open the Epic Games Launcher. If you don’t have this launcher, you can download it through the following URL: https://store.epicgames.com/en-US/download.
Once installed, head to the “Unreal Engine” tab on the left side. You can click on the “Library” tab and add a new engine version.
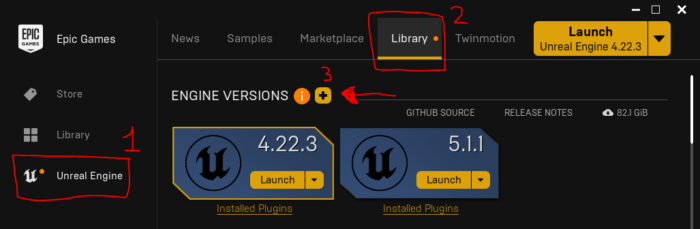
When adding a new engine version, pick “5.1.X” where “X” can be any patch version.
Step 3. Installing Blender
Since we will be editing models and textures in this post, we need a tool to help us with that. We will be using Blender, a free and open-source software tool for 3D graphics and animations.
To install Blender, you can download it from their official download page, which you can find at the following URL: https://www.blender.org/download/. Another way to download Blender is to install it through the Steam store. You can find the Steam version through the following URL: https://store.steampowered.com/app/365670/Blender/.
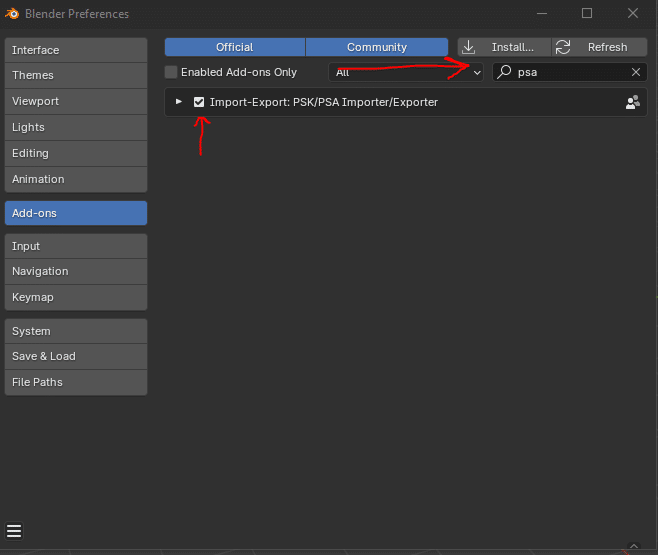
Step 4. Installing io_scene_psk_psa
With just Blender installed, we’re not quite there yet. As FModel exports the Unreal Engine models as “.psk”, we need a way to import these files into Blender. For this, we use a Blender plugin called “io_scene_psk_psa.”
Installing this plugin is relatively easy. Download the plugin by going to the following URL: https://github.com/DarklightGames/io_scene_psk_psa/releases/download/6.1.2/io_scene_psk_psa-master-6.1.2.zip.
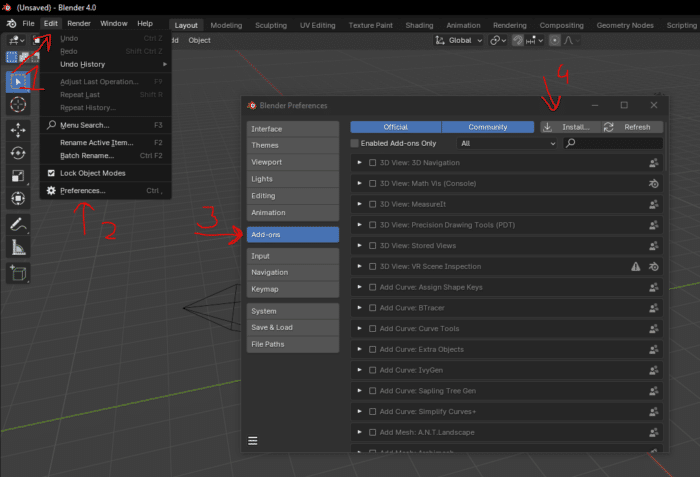
Next, open up Blender and go to “Edit -> Preferences… -> Add-ons -> Install…”. In the directory selection screen that pops up, go to where you downloaded the “io_scene_psk_psa” zip directory
and click on “Install Add-on.” After this is done, don’t forget to mark the checkbox so that the add-on gets enabled. You can find the add-on by searching for it in the search box.
Step 5. Exporting a Pal with FModel
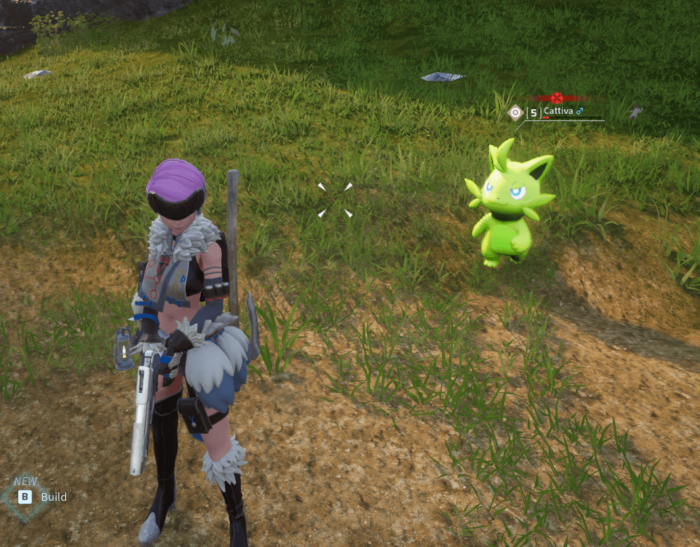
For this post, we will change some textures for the Pal “Cattiva”. If we select the “Pal” directory inside the “Folder” tab in Fmodel, we can press “Ctrl + Shift + F” to open up a search window. If we search for “Cattiva”, however, we won’t find a lot of assets. This is because the name Pal, as we see it in the game, is purely a display name, not the actual name the character has under the hood.
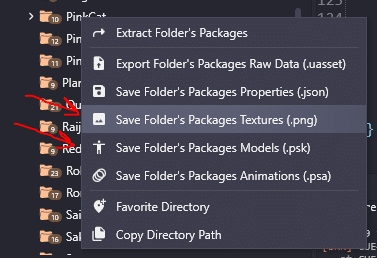
We will use a reference sheet to find the source name of our Pal that we want to edit. This sheet is accurate but has some minor flaws with a couple of words. It’s more than enough for our goals, however. You can find the reference sheet through this URL: https://github.com/KURAMAAA0/PalModding/blob/main/PalNamesCodeNames.txt. We can see that our Pal “Cattiva” is called “PinkCat”. If we search in FModel for “PinkCat”, we get many results back. What we’re looking for is our 3d model. This means that the location we’re looking for is “Pal/Content/Pal/Model/Character/Monster/PinkCat”.

If we navigate to that location in the “Folders” tab of FModel, we can right-click on the “PinkCat” directory and “Save Folder’s Packages Textures (.png)” and “Save Folder’s Packages Models (.psk)”.
We’ve now successfully exported the model from Palworld to our computer.
Step 6. Importing into Blender
We first need to open up Blender to get the model files we downloaded during the previous step into Blender. Next, hover your cursor over the starting cube and press “X” on your keyboard. Confirm the deletion. After doing so, navigate to the top left and click on “File -> Import -> Unreal PSK (.psk/.pskx)”. If you don’t see this option, follow Step 4. Installing io_scene_psk_psa.
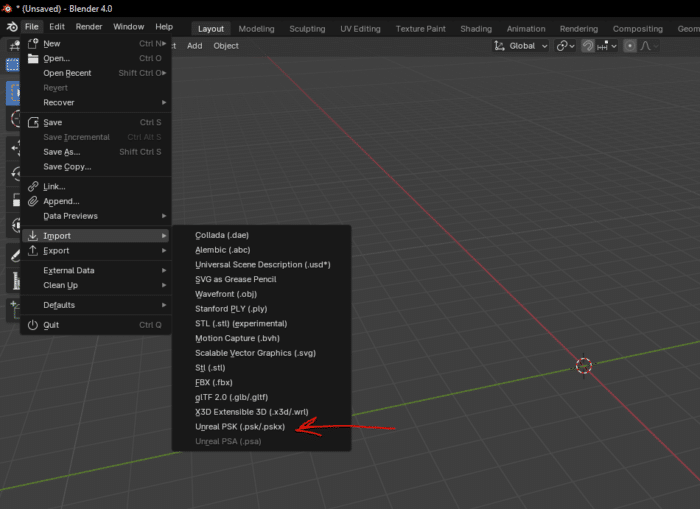
Navigate through the directories to the model you just now exported with FModel. For us, this was PinkCat. Double-click the “SK_.psk” file, which should be imported into Blender. Tip: if you want to move around in the scene window, use the “Middle mouse button + Shift.”
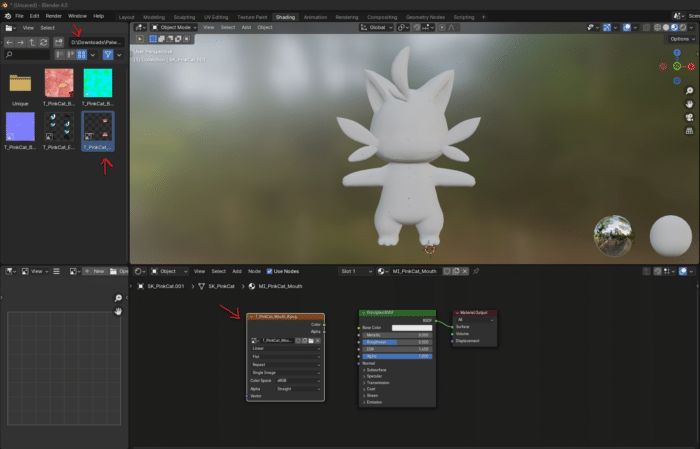
The first thing we should do after the import is to right-click on the “SK_” object in the Scene Collection menu and rename this to “Armature.”
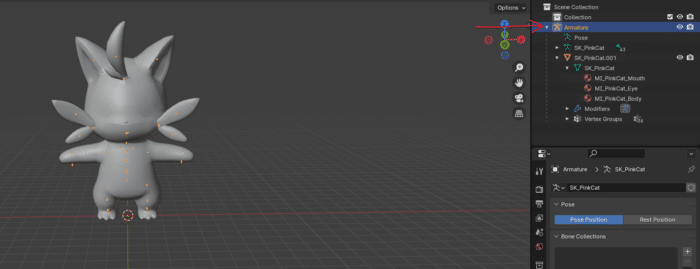
From the image above, you should notice that we have 3 “MI_” objects. We will use these in the next step to add our textures and create our custom textures.
Step 7. Updating our model in Blender
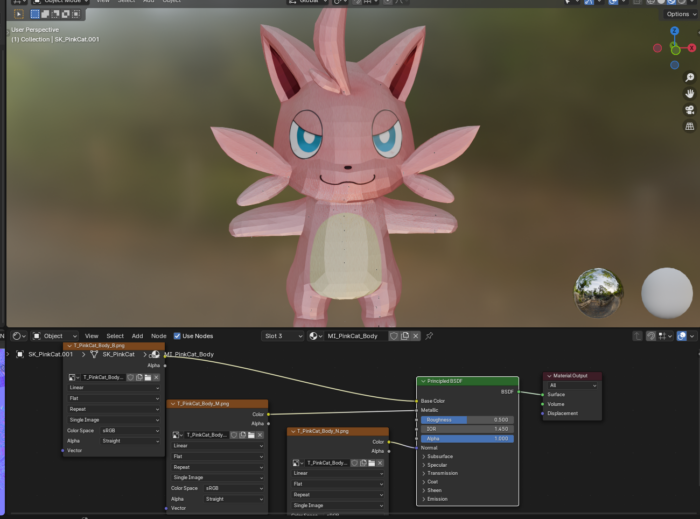
At the top of your Blender window, you should find a tab named “Shading”. Click on that tab, and Blender should load a new window layout.
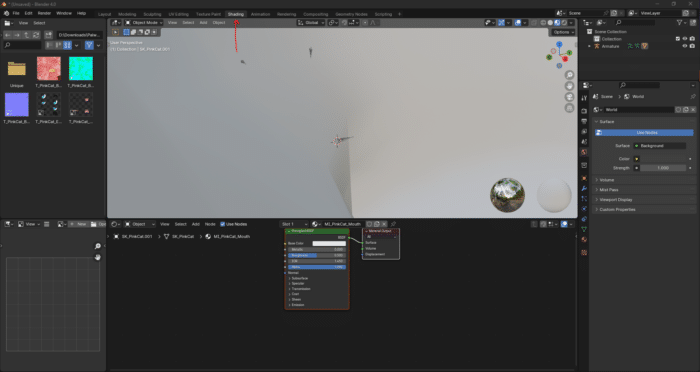
Once the shading tab is open, select one of the three “MI_” objects in your Scene Collection. We start with “MI_PinkCat_Mouth. “Notice in the image above that we navigated to our exported model directory in the file browser at the top left of the screen. We can drag our “T_PinkCat_Mouth_B.png” file into the workspace from there.
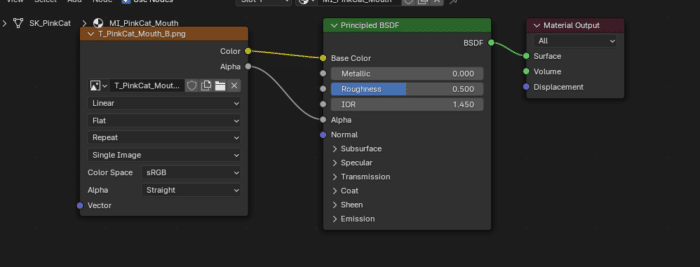
Next, we need to connect the “Color” node with the “Base Color” node from our “Principled BSDF” and our “Alpha” node with the respective “Alpha” node.
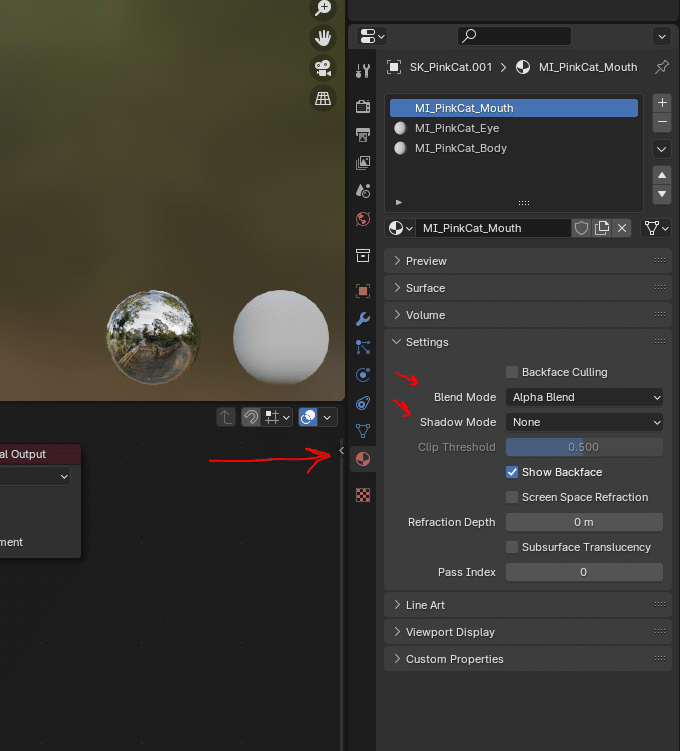
We should almost see a mouth now! In the right vertical menu of the screen, you will want to click on “Material” and from that screen, look for the “Settings” menu. Here, we will update the “Blend Mode” to “Alpha Blend” and the “Shadow Mode” to “None”.
You should now see your mouth appear! Do the same process for the eyes. For the body, you might see three separate files, “T_PinkCat_Body_B.png”, “T_PinkCat_Body_M.png” and “T_PinkCat_Body_N.png”.
Connect the texture maps to the corresponding inputs on the shader. For example:
- Connect “T_PinkCat_Body_B.png” to the Base Color input.
- Connect “T_PinkCat_Body_M.png” to the Metallic input.
- Connect “T_PinkCat_Body_N.png” to the Normal input.
This will look like the following.
For the body, don’t update the Blend and Shadow mode. Leave them as is, which is “Opaque”. Now that we’ve mapped our textures to our model, we will turn our “Cattiva” into green.
Editing our texture
To do this easily, we will be using an image manipulation program called “paint.net”, which you can download at the following URL: https://www.getpaint.net/. We will be editing the “T_PinkCat_Body_B.png” file, as this is our base color input. Save the edited image to a logical place on your computer and remember it. In this same place, we will export our Blender model to keep things organized.
If you want to see this image in action, drag and drop it onto the shading workspace in Blender and connect the Color node with the color node of “Principled BSDF”.
Step 8. Exporting from Blender
Now that our model is ready, we can start exporting it and importing it back into the game. In Blender, navigate to “File -> Export -> FBX (.fbx)” and click on it. Select a logical exporting location and ensure the following settings are correct. The “Scale” should be set to “0.10. “The checkbox for “Add Leaf Bones,” located under “Armature,” should be unchecked.
If your character is too big in the game or seems stuck in the T-pose position, these are the two settings you should look for. There are some cases where the exporting scale doesn’t work as expected. To solve this, when importing your model into Blender, scale down the model to “0.99” for the “X”, “Y” and “Z” axis.
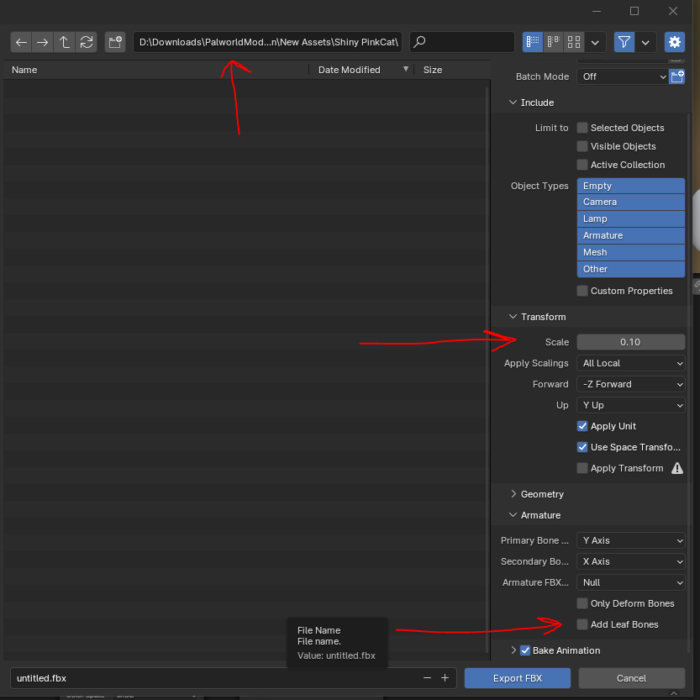
When you’ve double-checked the above settings, name your export “PinkCat” or the Pal code name you used and click on Export, and we’re done with Blender.
Step 9. Importing our model into Unreal Engine
If you’ve read and followed our Modding Palworld – Part 1 Getting Started post, you can skip the following part: Configuring Unreal Engine.
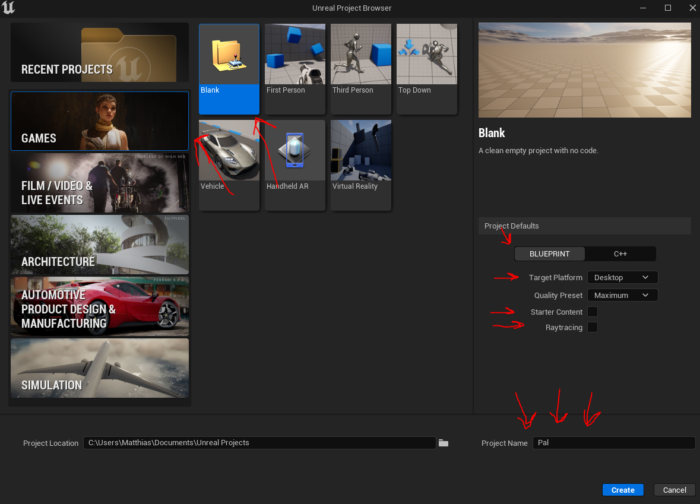
Creating a new Unreal Engine project
To get our model into the actual game, we need to package it through Unreal Engine. To do so, we need to create a project with the same version number “5.1.X”. Go back to the “Unreal Engine” tab in the “Epic Games Store” and click “Launch” on the Unreal Engine version 5.1.1. Create a new project with “Games -> Blank Project” and name it exactly “Pal”. If you don’t call it “Pal”, the task gets packaged in such a way that Palworld won’t see it as its own and, therefore, not load it.
The following settings for the project should be:
- Blueprint
- Target Platform “Desktop”
- Starter Content “Unchecked”
- Raytracing “Unchecked”
Configuring Unreal Engine
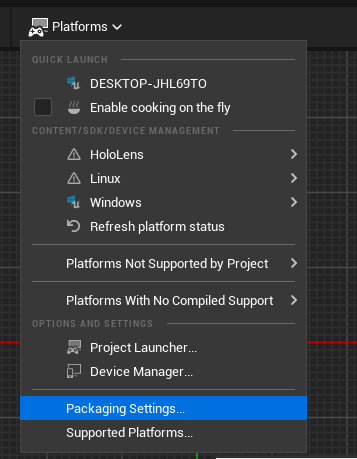
Once you’ve opened your “Pal” Unreal project, click on “Platforms” at the top and then go to “Packaging Settings…”
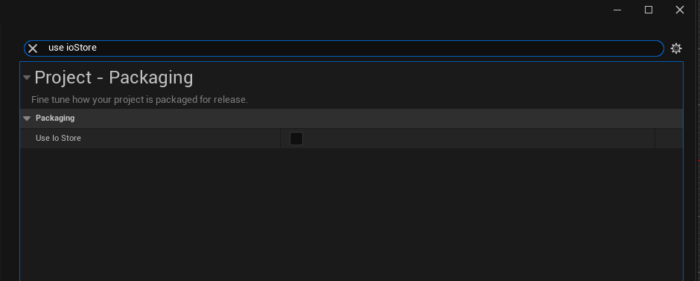
Next, search for “Use Io Store” and uncheck this setting.
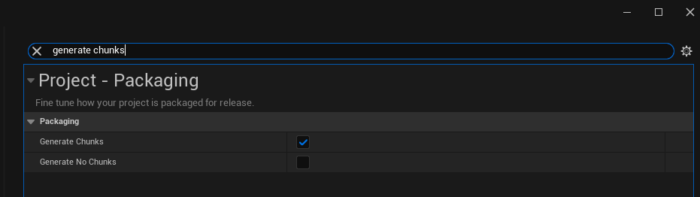
After unchecking the “Use Io Store” setting, search for “Generate Chunks” and check this.
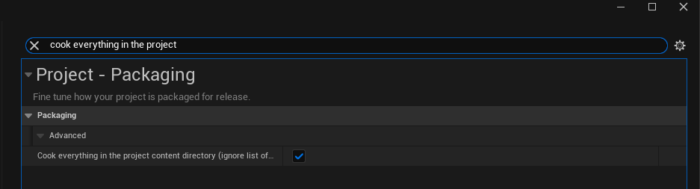
Last, search for “Cook everything” and check the “Cook everything in the project content directory (ignore list of maps below)” this setting.
When we downloaded our model from FModel, we went into a deep directory structure, “Pal -> Model -> Character -> Monster -> PinkCat”. This is the directory structure we need to make in Unreal Engine, exactly like we saw it in FModel. The game won’t know where to look for our model if we don’t.

We can finally drag and drop our edited model and texture into the “PinkCat” directory we created above.
When importing, you will be greeted with a “FBX Import Options” dialogue. We can just click on the blue button saying “Import All” and we’re ready to go.
You might also get a log output regarding the FBX model. You can close this window and ignore it. If we double-click on our model, we will see a familiar sight. Our textures don’t look right.
Fixing texture issues in Unreal Engine
To fix this, double-click on one of the transparent materials (eyes or mouth), which are the sphere objects. Next, change the “Blend Mode” to “Translucent” and then connect “A” (alpha) to “Opacity”.
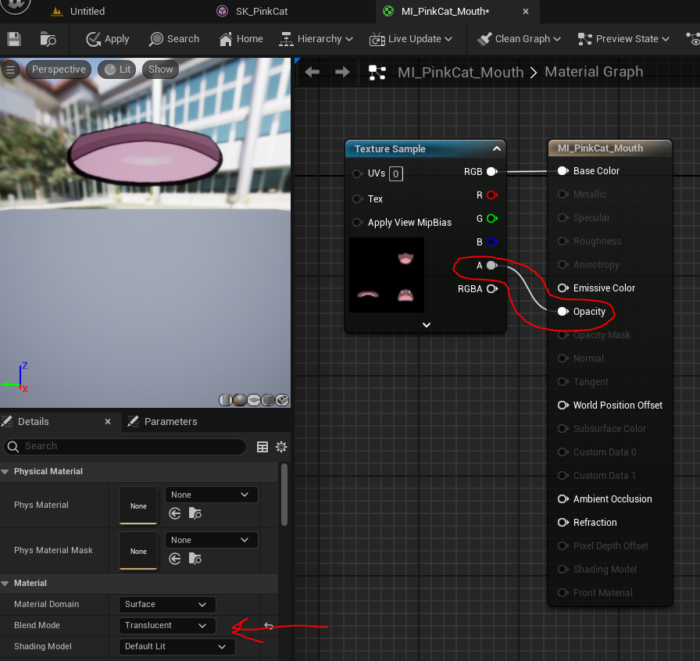
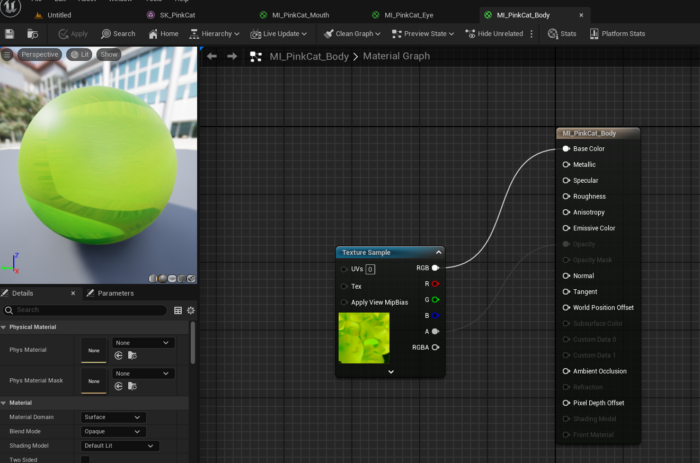
Click “Apply” in the top menu and save it by pressing “CTRL + S”. Repeat this for the other Material, eye or mouth. For the body, it’s a bit different. You might notice that the Material, the sphere, for the body is white. Double-click on it to open and navigate back to your workspace overview. Drag our “T_PinkCat_Body_B.png” onto the “MI_PinkCat_Body” window and wait until it opens. Next, drop the texture onto the workspace area. We can then delete the RGB node and connect our texture node to the body model.
Notice that in the bottom right corner of Unreal Engine, there is an “Unsaved” mention. Click on it and save your work. Next, open the workspace overview tab again and rename your models to reflect the model name as we exported them from FModel.
For us, this means:
- PinkCat -> SK_PinkCat
- PinkCat_PhysicsAsset -> SK_PinkCat_PhysicsAsset
- PinkCat_Skeleton -> SK_PinkCat_Skeleton

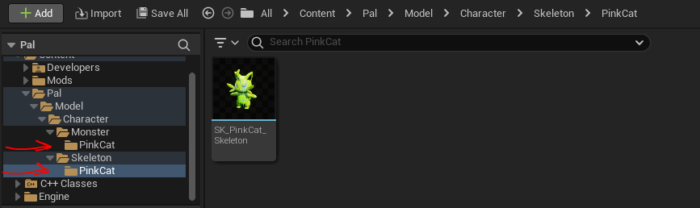
There’s one nuance here. When we exported our model from FModel, the “SK_PinkCat_Skeleton” wasn’t originally in our “Character -> Monster -> PinkCat” directory. Instead, it was in “Character -> Skeleton -> PinkCat”. So we need to fix this path issue. Our final directory structure becomes the following:
Step 10. Exporting our model from Unreal Engine
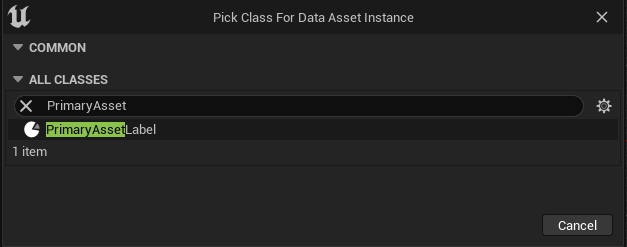
We’re at the last part of our “adding custom assets to Palworld” adventure. The only thing left to do is right-click on the “Content” directory inside Unreal Engine, hover over “Add/Import Content -> Miscellaneous” and select “Data Asset”.
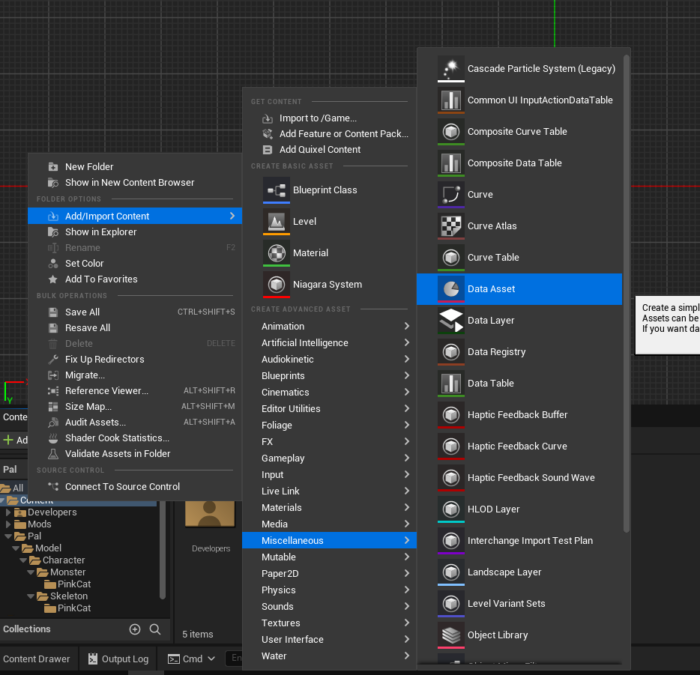
Search for “PrimaryAssetLabel” and select it.
Name it “Label_YourModName”. In our case, this will be “Label_GreenCat”. Next, double-click on your label asset and adjust the following settings:
- Set the priority to 1 or more
- Set the Chunk ID to a large number, 1000 or more. This is so we can easily identify which one is ours
- Set the Cook Rule to Always Cook
- Check the “Label Assets in My Directory” option
Finally, save everything again through the option in the bottom right. Click on “Platforms -> Windows -> Package Project” and give it a bit to compile your new asset mod. Once packaging is done, open up the packaging location and navigate through “Windows -> Pal -> Content -> Paks”. Inside this “Paks” directory, you’ll see your “.pak” file with your large chunk number. Rename this chunk file to “YourModeName_P.pak”. In our case, this is “GreenCat_P.pak.” The “_P” is necessary for the file to load.
Copy this “.pak” file and paste it into your Palworld game file under “../steamlibrary/Palworld/Pal/Content/Paks/”. Open up the game, find the Pal you adjusted, and enjoy!


Anonymous
11th March 2024This is a great guide, but you didn’t mention the FBX Import Options window that pops up when you drag and drop your asset into UE. What options should be enabled there?
Matthias
18th March 2024Thank you for your comment! We have added the part about the FBX Import Options to the post.
You can leave the settings there as they are and hit the Import All button.