Installing Magento 2.4 on Ubuntu 18.04
Installing Magento 2.4 can be quite a hassle to correctly execute. For this reason we have created a guide which will help you in correctly installing Magento 2.4 on Ubuntu 18.04.
What is Magento?
Prerequisites
In order to correctly install Magento 2 we are going to need some tools to help us. Currently the latest Magento 2 version is Magento 2.4. In order to get this version to work correctly for us, we need to install:
If you have also followed our guide on How to install Magento 2 on Ubuntu 18.04 / Windows 10 then this list should look familiar. The only real differences are that we upgraded our PHP version to 7.3. Besides that we added two new items, Elasticsearch and Mailhog.
Elasticsearch is required in Magento 2.4 in order to function correctly. For more information about what Elasticsearch is and about what it does, visit their official website here
Mailhog is an open source email testing tool. In Magento 2.4 a big change is that admin accounts are required to have a 2-step verification. For this you will receive an email. Since the Magento version we are installing is for local development we will not have a mail address linked to it. For that we will ‘spoof’ having a mail address with Mailhog.
Enough information, let us get into installing our prerequisites!
Step 1: Install a web server
In order to run Magento 2, it needs to be ran on something called a web server. A web server is a piece of software which is required to let people access your server. It consists of a set of rules which points users to the right web page. For this guide we will be using Apache.
If your Ubuntu has a Graphical User Interface (GUI) then you can either click on the terminal icon ![]() or press the following key combination: Ctrl+Alt+T.
or press the following key combination: Ctrl+Alt+T.
To install Apache run the following command inside your terminal:
sudo apt-get install apache2Once installed, Apache needs to be enabled.
sudo service apache2 start
sudo service apache2 restart
To check if Apache has been succesfully installed, enter the following into your web browser: http://localhost.
The following screen should be visible when Apache has been correctly installed.
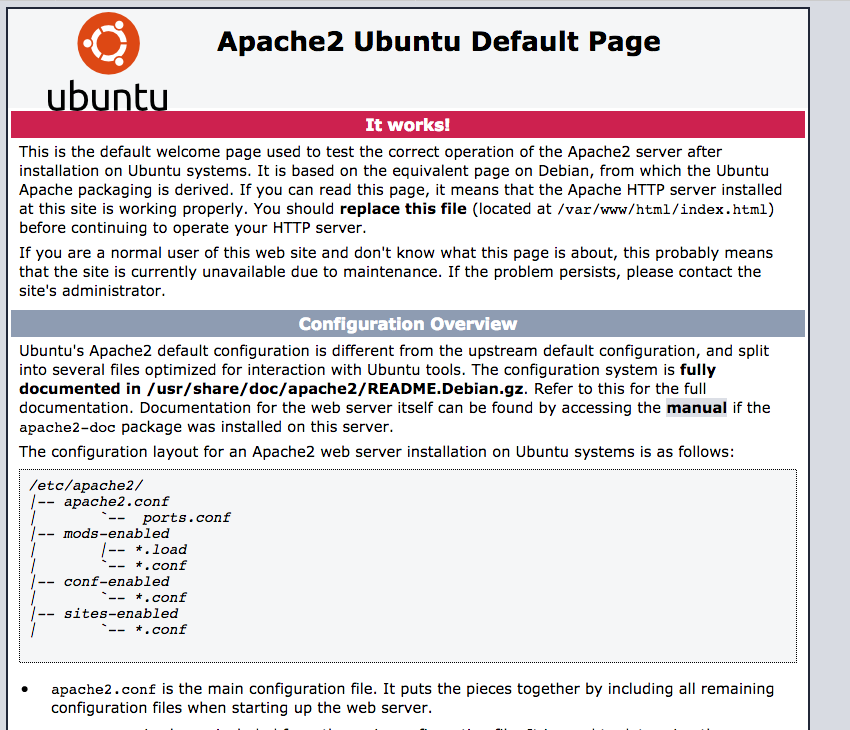
Note: Apache automatically stores files in the directory: /var/www/html
Step 2: Install MySQL
Now that the web server has been installed, we need to install the database as well. The database will be used to store all the information necessary to run the Magento shop. Some examples of data stored in the database are:
- Customers
- Products
- Orders
We will use a MySQL database server. To install the MySQL database server, run the following command:
sudo apt-get install mysql-client mysql-serversudo mysql_secure_installationYou should get a list of questions. Answer them as you please. For this guide we will go with the following:
- Would you like to setup VALIDATE PASSWORD plugin? (enter for none): Enter
- New password: Enter password
- Re-enter new password: Repeat password
- Remove anonymous users? [Y/n]: Y
- Disallow root login remotely? [Y/n]: Y
- Remove test database and access to it? [Y/n]: Y
- Reload privilege tables now? [Y/n]: Y
Step 3: Install PHP 7.3
PHP is necessary in order to run the server-sided code. To install PHP 7.3, which is a specific version, we first need to add the Ubuntu repository to our system:
sudo apt install software-properties-common
sudo add-apt-repository ppa:ondrej/php
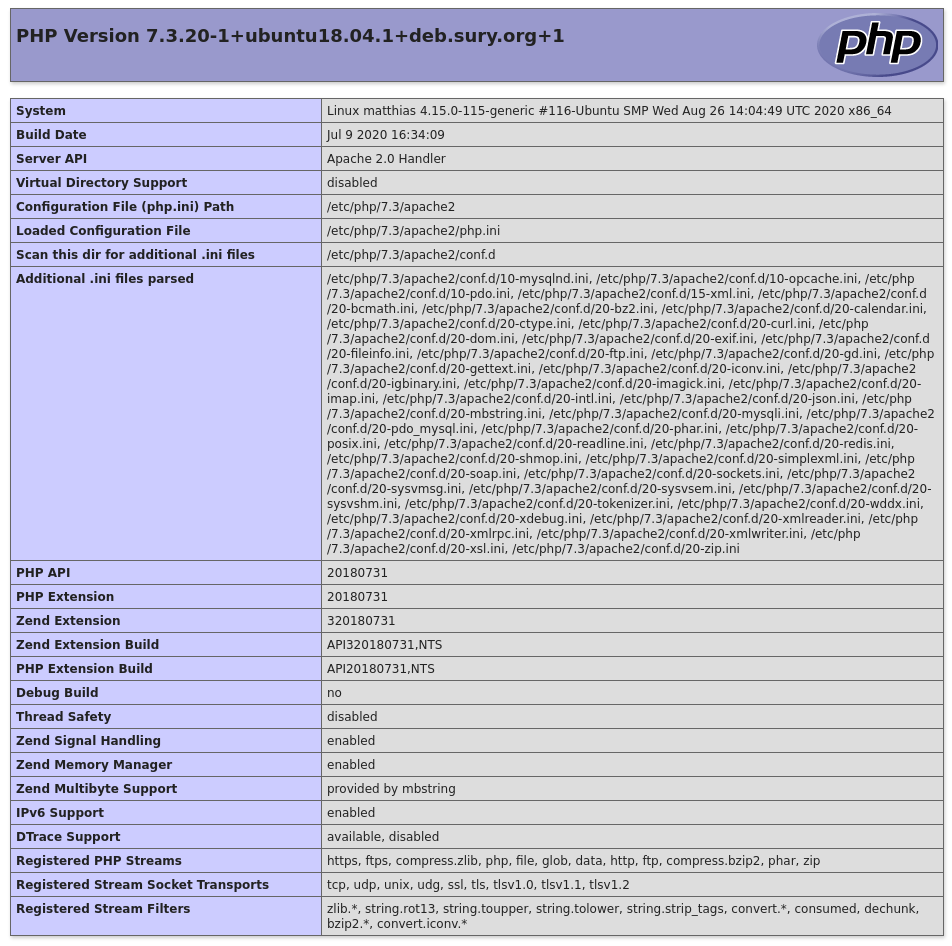
sudo apt updatesudo apt install php7.3 php7.3-curl php7.3-soap php7.3-mysql php7.3-cli php7.3-gd libapache2-mod-php7.3To check if all the modules are correctly installed, create a file called: info.php in the root directory of your webserver. Remember, by default this is located in: /var/www/html. The file should contain the following code:
<?php
phpinfo();
?>
You can now access this file using: http://localhost/info.php. If all went well, the following PHP properties should be visible.
Step 4: Install Composer
Composer is a package manager for PHP that handles dependencies of PHP software and required libraries. This is what we will be using to install Magento 2 and, when necessary, modules that expand upon Magento 2.
Let’s start by installing the dependencies. We are going to install the curl dependency in order to download Composer. php-mbstring provides necessary functions for composer. Git is used to download project dependencies and unzip is there to extract the archived git files.
sudo apt install curl php7.3-mbstring git unzipNow that we have the prerequisites for Composer, we can download and install the Composer installer.
Composer will install itself in the folder we specify so let us change that to the home directory.
cd ~curl -sS https://getcomposer.org/installer -o composer-setup.phpComposer wants us to verify the installation to make sure we did not download a shady version. We verify the installation by matching a pre-generated hash with a hash that we will make over the downloaded composer-setup.php. Since the pre-generated hash changes per version, please visit the Composer download page to find the current hash
HASH=48e3236262b34d30969dca3c37281b3b4bbe3221bda826ac6a9a62d6444cdb0dcd0615698a5cbe587c3f0fe57a54d8f5php -r "if (hash_file('sha384', 'composer-setup.php') === '$HASH') { echo 'Installer verified'; } else { echo 'Installer corrupt'; unlink('composer-setup.php'); } echo PHP_EOL;"If you see the message Installer verified you are good to go!
Let us run the installer now and when it is done remove the installer file.
php composer-setup.phpphp -r "unlink('composer-setup.php');"We are missing a small detail right now and that is that we need to run composer like this
php composer.pharThis is not really optimal. We want it to be globally accessible. To do so, execute the following
mv composer.phar /usr/local/bin/composerNow let us try it again
composerIf you got an output showing the following, then you are good to go.
______
  / ____/___  ____ ___  ____  ____  ________  _____
 / /   / __ \/ __ `__ \/ __ \/ __ \/ ___/ _ \/ ___/
/ /___/ /_/ / / / / / / /_/ / /_/ (__  )  __/ /
\____/\____/_/ /_/ /_/ .___/\____/____/\___/_/
                    /_/
Step 5: Install Elasticsearch 7.x
Elasticsearch requires Java to run on your system so we will need to install it if we do not have it yet
To check whether your system already has Java installed type in the following:
java -versionIf you have Java installed you should see the following and you are good to go!
java -version
openjdk version "11.0.8" 2020-07-14
OpenJDK Runtime Environment (build 11.0.8+10-post-Ubuntu-0ubuntu118.04.1)
OpenJDK 64-Bit Server VM (build 11.0.8+10-post-Ubuntu-0ubuntu118.04.1, mixed mode, sharing)
If you do not see the above respond but instead see something like
Command 'java' not found, but can be installed with:

apt install default-jre
apt install openjdk-11-jre-headless
apt install openjdk-8-jre-headless
So let us follow what that message said and install the default-jre
sudo apt install default-jreVerify your installation by running java -version again. You should now see the required output
With Java installed we can move on to installing Elasticsearch. We do this by first adding the GPG key to our system which is needed for the Elasticsearch repository
sudo apt-get install apt-transport-https
wget -qO - https://artifacts.elastic.co/GPG-KEY-elasticsearch | sudo apt-key add -
Now we can add the repository
sudo add-apt-repository "deb https://artifacts.elastic.co/packages/7.x/apt stable main"After we have added the repository we need to update our system cache to show us the newly added repository files and then install Elasticsearch on our system.
sudo apt update
sudo apt install elasticsearch
Next, we will need to launch Elasticsearch
sudo /bin/systemctl enable elasticsearch.serviceThen start or stop it with
sudo systemctl start elasticsearch.service
sudo systemctl stop elasticsearch.service
Finally, as usual, test to see if what we just installed works
curl -X GET "http://localhost:9200/?pretty"If everything went well you should see something like the following
{
  "name" : "matthias",
  "cluster_name" : "elasticsearch",
  "cluster_uuid" : "GJoq7SYeTlCTFiMsT0fM6A",
  "version" : {
    "number" : "7.8.1",
    "build_flavor" : "default",
    "build_type" : "deb",
    "build_hash" : "b5ca9c58fb664ca8bf9e4057fc229b3396bf3a89",
    "build_date" : "2020-07-21T16:40:44.668009Z",
    "build_snapshot" : false,
    "lucene_version" : "8.5.1",
    "minimum_wire_compatibility_version" : "6.8.0",
    "minimum_index_compatibility_version" : "6.0.0-beta1"
  },
  "tagline" : "You Know, for Search"
}
Step 6: Install Mailhog
Installing Mailhog is super easy, configuring it can be a bit more tricky. Let us start by installing it first
sudo apt -y install golang-go
go get github.com/mailhog/MailHog
To start Mailhog after we have installed it, type the following
~/go/bin/MailHogNote: The above command is for Ubuntu systems. If you are following this guide from another OS, check where Golang installs the binary files. Mailhog should be installed there.
If everything went well you should be greeted with the following after running Mailhog
matthias@matthias:~mailhog
2020/09/04 13:00:15 Using in-memory storage
2020/09/04 13:00:15 [SMTP] Binding to address: 0.0.0.0:1025
[HTTP] Binding to address: 0.0.0.0:8025
2020/09/04 13:00:15 Serving under http://0.0.0.0:8025/
Creating API v1 with WebPath:
Creating API v2 with WebPath:
Now that Mailhog works we need to adjust our PHP to be able to send mails that can be intercepted by Mailhog
sudo nano /etc/php/7.3/apache2/php.iniFind the line where it says sendmail_path you can search in Nano by pressing the CTRL + W key combination
Add the following line to where it says sendmail_path
sendmail_path = "/usr/local/bin/mailhog sendmail [email protected]"There is a new binary which we just added to the sendmail_path line, sendmail. We will need to install this in order for PHP and Mailhog to work correctly together
sudo apt install sendmailSeeing as we changed the Apache2 PHP configuration we need to restart the Apache2 service
service apache2 restartInstalling Magento 2.4
Note: If you have not read prerequisites yet, please do so.
Let us start by installing the necessary PHP modules required for Magento 2.
sudo apt install php7.3-common php7.3-gmp php7.3-bcmath php7.3-intl php7.3-xmlrpc php7.3-xml php7.3-zipOpen a connection to your database
sudo mysql -uroot -pCreate a database called magento2 (or any other name you would like your database to have)
mysql> CREATE DATABASE magento2;Create a database user called mage2user with a password
mysql> CREATE USER 'mage2user'@'localhost' IDENTIFIED BY 'PASSWORD';mysql> GRANT ALL ON magento2.* TO 'mage2user'@'localhost' IDENTIFIED BY 'SAME_PASSWORD_AS_ABOVE' WITH GRANT OPTION;Flush the database privileges to save your changes
mysql> FLUSH PRIVILEGES;
mysql> EXIT;
Now we are going to configure our web server
sudo nano /etc/apache2/sites-available/magento2store.conf<VirtualHost *:80>
ServerAdmin [email protected]
DocumentRoot /var/www/html/magento2/
ServerName example.com
ServerAlias www.example.com
<Directory "/var/www/html/magento2">
Options Indexes FollowSymLinks MultiViews
AllowOverride All
Order allow,deny
allow from all
</Directory>
ErrorLog ${APACHE_LOG_DIR}/error.log
CustomLog ${APACHE_LOG_DIR}/access.log combined
</VirtualHost>Save and exit this file by using CTRL+X Y
sudo a2ensite magento2store.conf
sudo a2enmod rewrite
sudo service apache2 restart
Now we are ready to download and install Magento 2!
To begin, open up the terminal. If your Ubuntu has a GUI then you can either click on the terminal icon ![]() or press the following key combination: Ctrl+Alt+T.
or press the following key combination: Ctrl+Alt+T.
Change your terminal user to the web user
sudo su -l www-data -s /bin/bashMove directories to your webroot
cd /var/www/htmlCreate a new Composer project from the Magento 2 repository
composer create-project --repository-url=https://repo.magento.com/ magento/project-community-edition magento2Now we will use a command to change directory and file permissions to the ones Magento recommends
cd magento2find . -type d -exec chmod 700 {} \; && find . -type f -exec chmod 600 {} \;Lastly, edit and execute the following command
php bin/magento setup:install \
--base-url="http://yoururl.com/" \
--db-host="localhost" \
--db-name="magento2" \
--db-user="mage2user" \
--db-password="PASSWORD_YOU_CREATED_FOR_THE_DATABASE_USER" \
--admin-firstname="admin" \
--admin-lastname="admin" \
--admin-email="[email protected]" \
--admin-user="admin" \
--admin-password="admin123" \
--language="en_US" \
--currency="USD" \
--timezone="America/Chicago" \
--use-rewrites="1" \
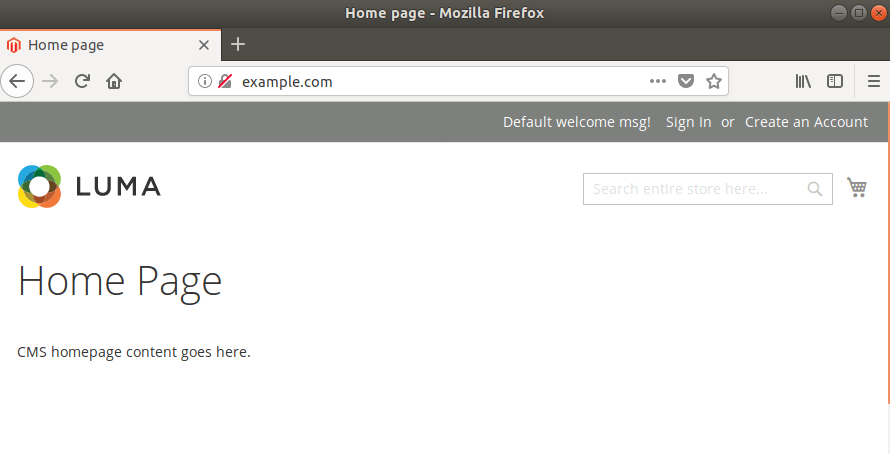
--backend-frontname="admin"Try visiting the URL you set up in your web server host. In our case it was example.com
If all went well, you should see the following
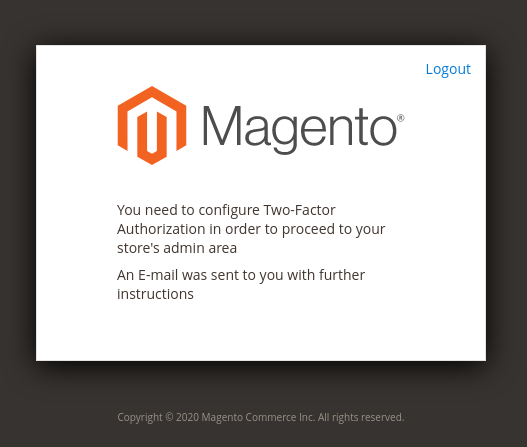
Normally we should be done right there, however in Magento 2.4 the 2-step authentication for admin users is not something we can ignore.
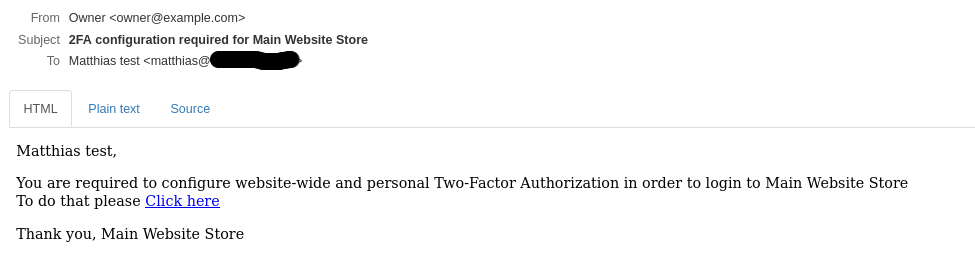
Go to your Mailhog, if it is running, address which should be, http://0.0.0.0:8025 and leave it open.
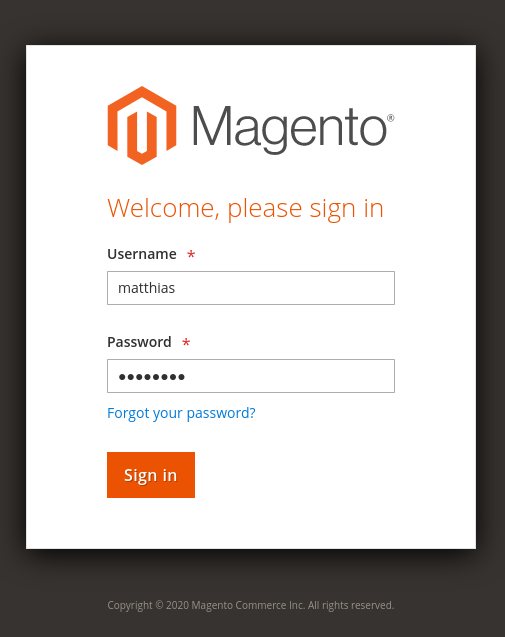
Visit your admin URL which you set in the install command. In our case it is example.com/admin
Upon entering your admin credentials and pressing login you should see the following:
Now go to your Mailhog tab and check the email you just received. Click on the link.
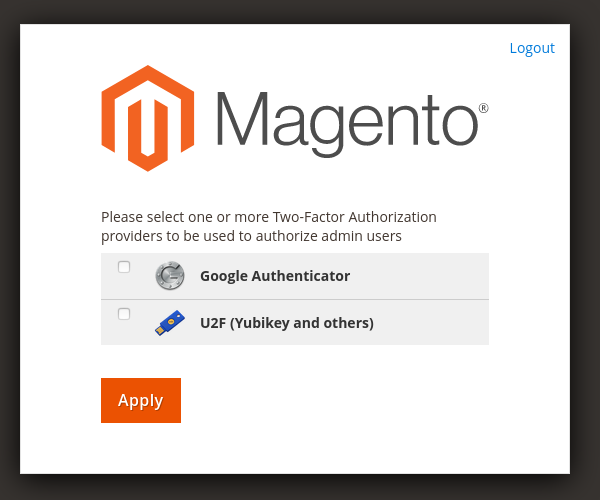
You should be greeted with a screen which tells you to pick your 2-step method. Follow the steps and enjoy your newly installed Magento 2.4!


sertac
15th February 2021really nice tutorial. will recommend.