Modding Palworld – Part 1 Getting Started
Just like the majority of the internet, we have been addicted to Palworld this last week and have since delved into the art of modding Palworld. Modding games is a fun way to add and adjust features in a playful way and learn more about programming.
On my journey to figuring out how to mod Palworld, I found myself consulting many different online sources on how to create, package and seeing my mods visibly. This post aims to put all that information together in bite-sized parts so you, the reader, can start your own modding journey.
In this post, we will be setting up your computer to make it mod creation ready and we will also be creating a simple Unreal Engine blueprint mod that will add a large text to the game’s viewport (screen). This might not sound very exciting but it will make sure that everything we’ve setup is actually working well.
We expect basic knowledge of Unreal Engine as this post’s scope is not about teaching Unreal Engine. If you’re a complete beginner, we recommend you to get some familiarity first with Unreal Engine. We recommend the following two starting places for newcomers to Unreal Engine: https://docs.unrealengine.com/5.3/en-US/samples-and-tutorials-for-unreal-engine/ and https://www.youtube.com/watch?v=6UlU_FsicK8.
Prerequisites
Before we can start doing all kinds of cool modding activities, we first need to setup everything we will be using. Unlike the Modding Terraria – Part 1 Getting Started post we’ve made, Modding Palworld takes a little or rather, a lot more patience and effort to get started. Don’t worry, we will walk you through it step-by-step.
If at any point you seem lost or can’t figure out what to do next, feel free to contact us through either the comments below the post or by visiting our Contact us page and we’ll come back to you!
We will go through the items in the list below and explain them step-by-step. If you already have specific items from the list below installed and configured correctly, feel free to skip the step.
- Step 1. Installing UE4SS
- Step 2. Installing .NET 6
- Step 3. Installing Visual Studio 2022
- Step 4. Installing Unreal Engine 5.1
- Step 5. Installing Wwise
- Step 6. Installing PalworldModdingKit SDK
- Step 7. Integrating Wwise
- Step 8. Launching the mod project
- Step 9. Creating our first mod
- Step 10. Packaging our first mod
Step 1. Installing UE4SS
UE4SS, or Unreal Engine 4/5 Scripting System, is a Lua scripting system platform, C++ Modding API, SDK generator, blueprint mod loader, live property editor and general purpose dumping utility for UE4/5 games.
We will be using this system to load and manage our future mods. Unlike our Terraria modding series which we mentioned above, Palworld doesn’t have its own mod loading client. Therefore, we need a thirdparty solution for this to work. You can download this system through the following URL: https://github.com/UE4SS-RE/RE-UE4SS/releases/download/v2.5.2/UE4SS_Xinput_v2.5.2.zip.
After you’ve downloaded this, extract the archive. Next, copy the following directory and files “Mods”, “UE4SS-settings.ini” and “xinput1_3.dll” to your “..\steamapps\common\Palworld\Pal\Binaries\Win64” directory. If you don’t know where your Palworld installation directory is, you can click on “Browse local files” when right clicking the game on Steam under “Manage”.
We’re almost done installing UE4SS. Open up the “Mods” directory you copied earlier and open the “mods.txt” file in an editor of choice. Update the line with “BPModLoaderMod : 0” to “BPModLoaderMod : 1”. This change will make it so that UE4SS will load custom blueprint mods. In this tutorial we will be making a blueprint mod so we need this setting enabled.
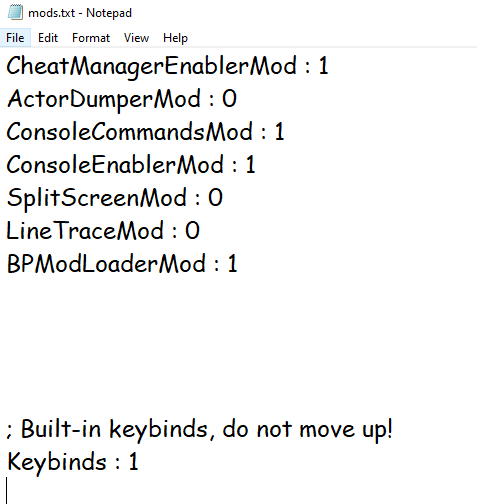
Optionally, in the “..\steamapps\common\Palworld\Pal\Binaries\Win64” directory, edit the “UE4SS-settings.ini” file and change “GuiConsoleVisible = 0” to “GuiConsoleVisible = 1”. This will open an extra window when booting Palworld where we can debug our mods.

Step 2. Installing .NET 6
Downloading and installing .NET 6 is a bit more straightforward than the last step.
First, visit the following URL: https://dotnet.microsoft.com/en-us/download/dotnet/6.0/runtime?cid=getdotnetcore&os=windows&arch=x64 and download the “x64” version for console apps.
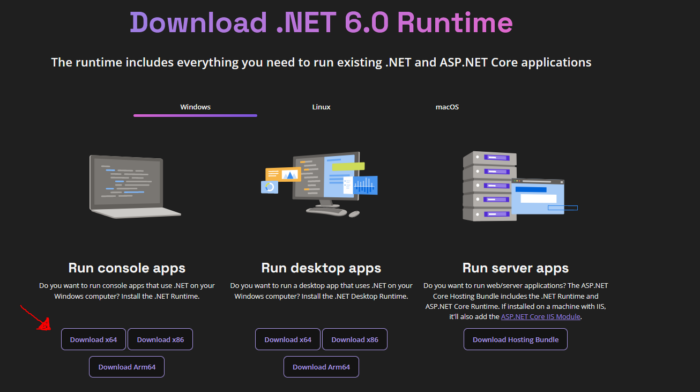
Next, execute the installer and install the runtime.
Step 3. Installing Visual Studio 2022
In a later step we will be downloading and compiling the SDK, for this to sucessfully compile we require Visual Studio 2022. You can download Visual Studio 2022 through the following URL: https://visualstudio.microsoft.com/vs/. Make sure you download the community edition as this one is free to use.
When installing Visual Studio 2022, make sure you install the following components when asked about it:


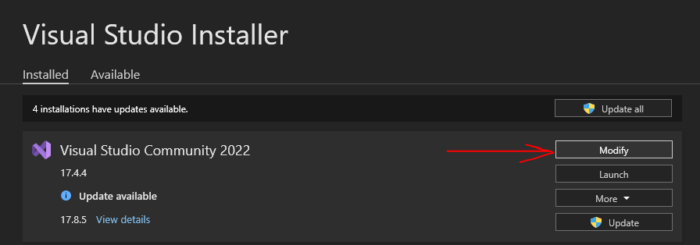
If you’ve already installed Visual Studio 2022, you can press the Windows key, or click on the start icon on your taskbar to open the Windows drawer. In here you can type “Visual Studio Installer” to bring up the installer again. From here you can modify a currently installed Visual Studio version and add or remove components.
After everything’s done installing, you’re done with this step.
Step 4. Installing Unreal Engine 5.1
Since we’re modding an Unreal Engine game, we’re going to need to install the engine ourselves too. In order to install Unreal Engine 5, you need to open the Epic Games Launcher. If you don’t have this launcher, you can download it through the following URL: https://store.epicgames.com/en-US/download.
Once installed, head over to the “Unreal Engine” tab on the left hand side. From here you can click on the “Library” tab and add a new engine version.
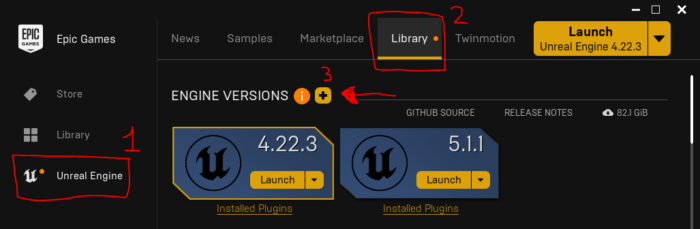
When adding a new engine version, make sure you pick “5.1.X” where “X” can be any patch version.
Step 5. Installing Wwise
Wwise is used by Palworld for its sounds. Sadly, even if you’re not planning on doing anything sound related, you still need to install Wwise to compile the project. installing Wwise is a bit annoying as it requires making a free account.
To install Wwise, visit the following URL: https://www.audiokinetic.com/en/. Under the dropdown button “Get Started”, you can find “Download AudioKinetic Launcher”, click on this and follow the steps.

After you’ve created an account, downloaded the launcher and installed it, log in again through the launcher with the same account credentials you just created. Next, head over to the “Wwise” tab on the left hand side. Here, you should find “Install a new version” at the bottom of your screen. Select “2021.1.11” as your version and click install.

This will bring up a new page where you should select the following: “Authoring, SDK (C++) and ‘Microsoft -> Windows -> Visual Studio 2022′”. Your end selection should look like this;
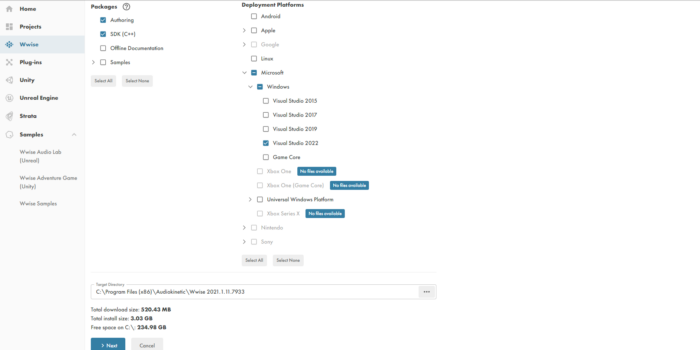
If preferred, change your target directory. Remember this directory as you will need it in a later step.
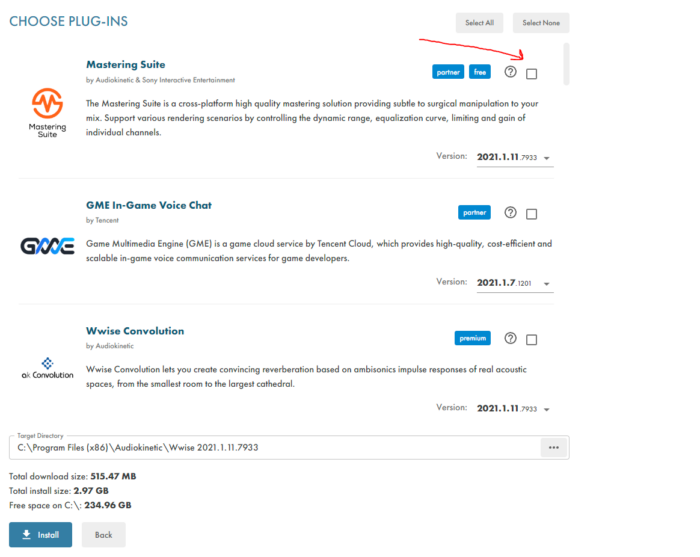
The next page should let you choose some plug-ins. You can deselect all of them and click install.
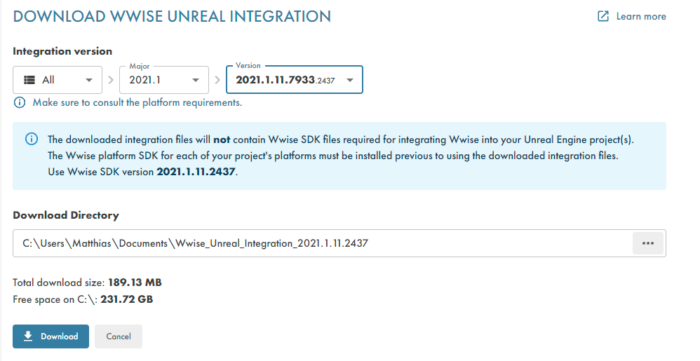
After Wwise is done installing, click on the “Unreal Engine” tab on the left hand side. Next, click on the Download dropdown and select “Offline integration files”. In this screen select the same version we just downloaded and remember this directory as well. Hit install
Step 6. Installing PalworldModdingKit SDK
Now we can finally move to something a bit more exciting, the Software Development Kit (SDK) we will be using. A SDK is a collection of utilities which are useful when developing computer programs. This specific SDK is basically an Unreal Engine project with all the source files of Palworld so that you can reference them and use them to rebuild your modded project.
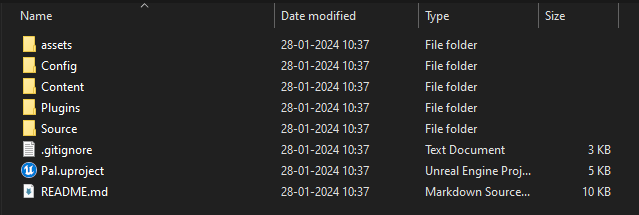
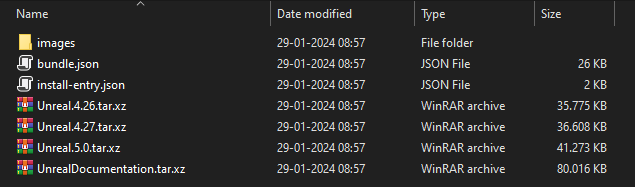
To download the SDK visit the following URL: https://codeload.github.com/localcc/PalworldModdingKit/zip/refs/heads/main. After it’s done downloading, extract it and open the directory. You should see the following contents:
Step 7. Integrating Wwise
Before we can open our project in Unreal Engine, we need to manually integrate Wwise. The version we downloaded from Wwise is not officially supported with the version the game uses. Therefore, we have to manually copy it.
Remember when we downloaded the offline integration in Step 4. Installing Wwise? We will be using that directory now. Open this directory and you should see the following directory structure.
Inside this directory you should see “Unreal.5.0.tar.xz”. Unpack this archive. Sometimes you might still get a “.tar” file after unpacking. Unpack that one too. You should have a “Wwise” directory now.
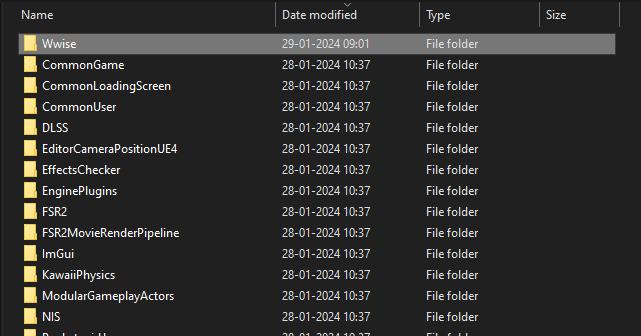
Copy this “Wwise” directory into the “Plugins” directory of the SDK.
We’re almost there now!
The final step, is to enter the “Wwise” directory we just copied and create a new directory called “ThirdParty”. Next, open up the original Wwise installation directory. This is not the offline integration but the directory where we actually installed it.
For us, this directory is in: “C:\Program Files (x86)\Audiokinetic\Wwise 2021.1.11.7933\SDK”. Inside this “SDK” directory we need to copy the following directories: “Win32_vc170”, “x64_vc170” and “include”. Paste these into the “ThirdParty” directory we just created.
Finally, duplicate the “Win32_vc170” and “x64_vc170” directories and rename the duplicates to “Win32_vc160” and “x64_vc170” respectively.
There’s a small nuisance with Wwise where you need to confirm a dialog box every time you load up the Unreal Engine. To fix this open the “Wwise.uplugin” file in a text editor of choice and update the following line: “”EngineVersion” : “5.0.0”,” to “”EngineVersion” : “5.1”,”. This “Wwise.uplugin” should be inside the “Plugins/Wwise” directory.
Step 8. Launching the mod project
We’re finally done with all the configurations!
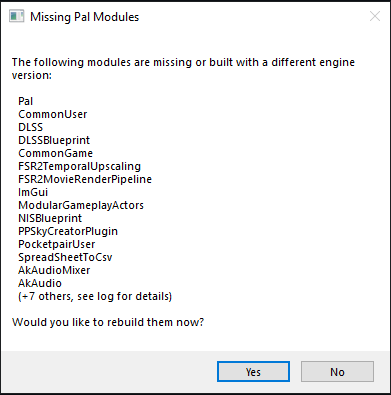
Now it’s time to open up our “Pal.uproject” which is located in the SDK directory. Clicking on the project will give you a dialog box saying modules are out of date and need to be recompiled. Click “Yes”.
Now, it’s time to be very patient. Depending on your system’s hardware this might take a while. Be sure not to click on the “Pal.uproject” multiple times while the recompilation is happening. This may cause a “Pal could not be compiled. Try rebuilding from source manually.” error. If you open your Task Manager you should see that the project is still busy recompiling so be patient.
After Unreal Engine has finally booted up, you might see a message about Wwise paths issues. You can safely press the “Don’t show this again” and close the dialog.

Step 9. Creating our first mod
In the “Content Browser” of Unreal Engine you should see the directory structure. Under “All -> Content” we will create a new directory called “Mods”. This directory will hold all our mods we will be making. Inside the “Mods” directory we will create one more directory called “FirstMod”. Your final directory structure should look like this.

Creating the Blueprint Class
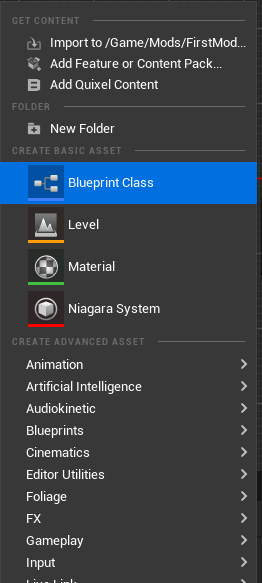
Inside of the “FirstMod” directory, right click and create a “Blueprint Class”. Click on “Actor” in the screen that pops up and call it ModActor. This Blueprint class will hold the logic our mod will be using and will be our main entry point.

Once you’ve created the “ModActor”, double click to open it. On the top you should see a window called “Event Graph”. This is the view we will be using for now. Inside this view, you should see a screen with 3 items called “nodes”.
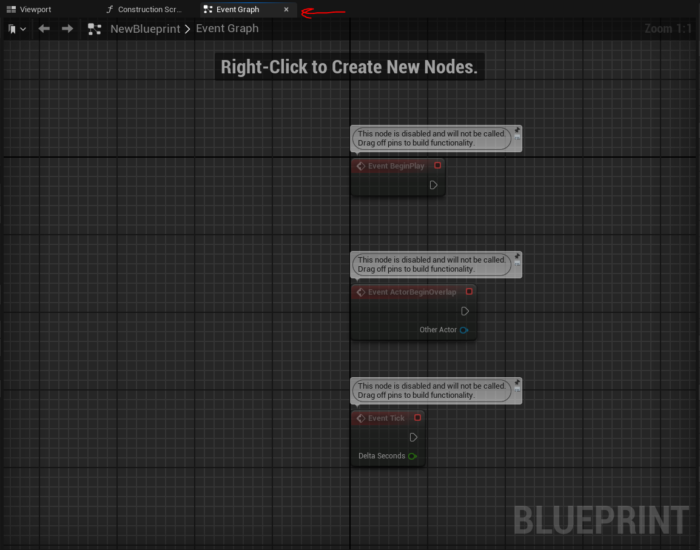
We will be selecting the “Event ActorBeginOverlap” and “Event BeginPlay” and delete them by pressing the “delete” key. We won’t be needing these for now. Instead, we will be right clicking on the blueprint screen and typing “Add Custom Event”. Once you’ve typed and pressed enter, name your event: “PostBeginPlay”. This event is called after all other “Actors” have been initialized, via their “PreBeginPlay()” events. This event is generally used to initialize properties, find references to other Actors in the world, and perform any other general initialization.
Normally you wouldn’t use this event often, but for this first tutorial we will be using it to create a simple text that will be visible at all times. This is to make sure we’ve set everything up properly.
Creating the Blueprint Widget
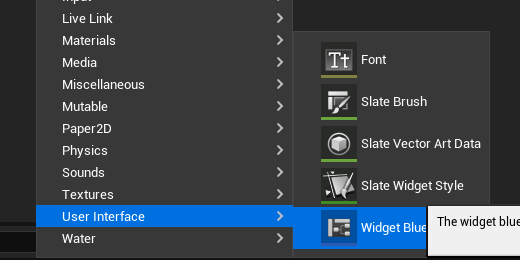
After you’ve created your “PostBeginPlay” event, hop over to your first workspace, the one with the “Content Browser”. Inside the “FirstMod” directory, we will right click and create a “User Interface -> Widget Blueprint”
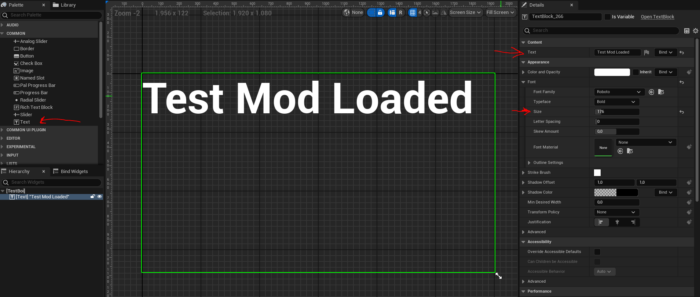
We will be naming this “TestText” but the name can be anything you want. Like before, double click it to open it up. In this screen we will drag a “Text” component from the left hand side to our screen and make it a big text saying “Test Mod Loaded”.
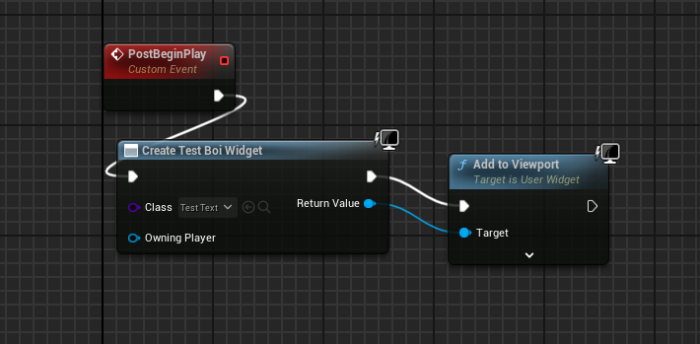
Now that we’ve setup our Blueprint Widget, head back to the “ModActor”. From the white arrow underneath the “PostBeginPlay” event, drag and in the menu that pops up, type “Create Widget” and select the one from the “User Interface”.
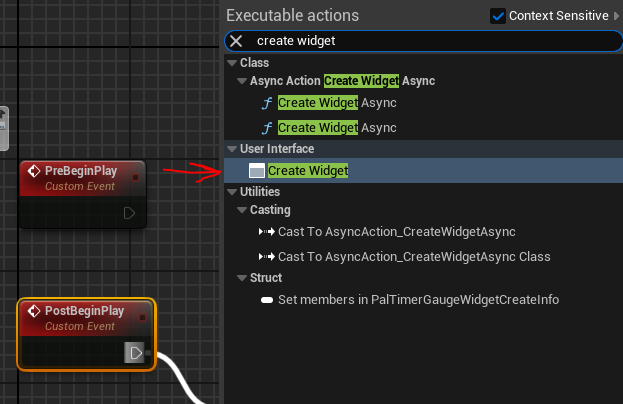
In this new node, click on “Select Class” and type the name of your Blueprint Widget, in our case this was “TestText”. For the “Return Value”, you should drag and search for “Add to Viewport” which is also under “User Interface”. This will place our “Test Mod Loaded” text onto the screen everywhere we go.
Your final blueprint screen should look like this.
This will be everything we’re doing for now.
Step 10. Packaging our first mod
Before we can load our mod into the actual game, there’s a couple settings we need to adjust within Unreal Engine.
Make sure the game is closed otherwise you won’t see your mod show up until you’ve restarted the game.
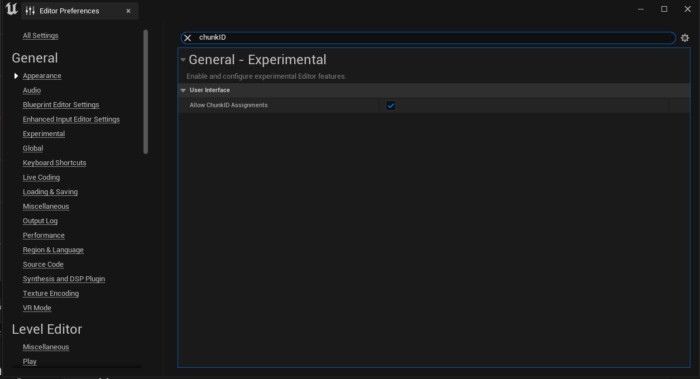
First, go to “Edit -> Editor Preferences” and search for “ChunkID” and enable the “Allow ChunkID Assignments” option
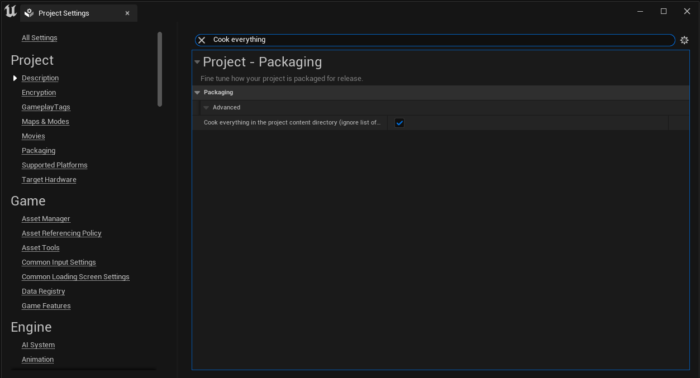
Next, go to “Edit -> Project Settings” and search for “Cook everything” and enable the “Cook everything in the project content directory” option
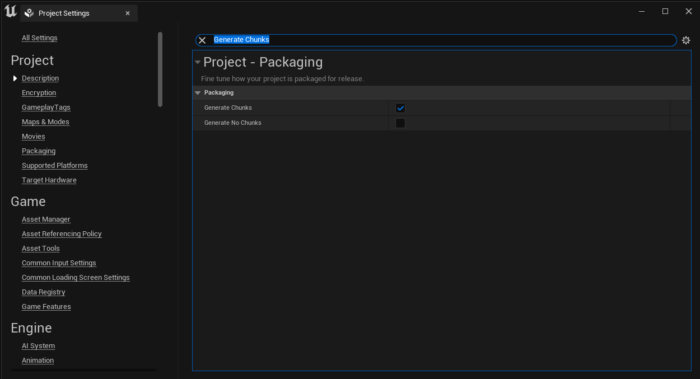
Finally, in the “Project Settings”, search for “Generate Chunks” and enable the option.
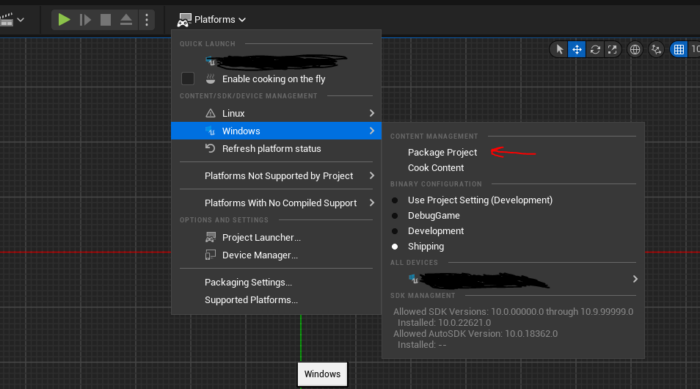
Now that we’ve done the configuration part, we can move to our workspace screen and inside the “FirstMod” directory, select and right click on your “ModActor” and “TestText” blueprints. In the right click menu, click on “Asset Actions -> Assign to Chunk…”. In the dialog box enter a number which you can remember. We will be using “123” for this demo. Once you’ve done that, click on “Platforms” at the top of your Unreal Engine window and go to “Windows -> Package Project”.
Depending on your system, this might take a while. Once it’s done, open up the location where you’ve said it to package to and you should see the following directory structure.

The next step is, renaming the “pakchunk123-Windows.pak” to “FirstMod.pak”. This is the name of our mod we made in Unreal Engine. Next, open up your Palworld Steam directory again and navigate to “..\steamapps\common\Palworld\Pal\Content\Paks”. Inside this directory, create a new directory called “LogicMods”. UE4SS, which we installed in Step 1. Installing UE4SS, will detect this directory as a Blueprint logic mods directory and load our mod. Inside the newly created “LogicMods” directory, paste or move your “FirstMod.pak” file.
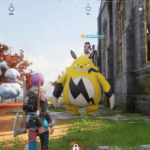
Now you can open up Palworld and see your amazingly new mod appear on the screen!

Conclusion
We’ve successfully created a mod for Palworld and shown you how to mod Palworld! You might notice now that you can’t click on any buttons. This is due to our text being assigned to the viewport and therefore overlaying on the screen. For now this is fine as all our setup and configuration has worked properly. To get the game back to its normal state, just remove the “FirstMod.pak” we copied into the Steam directory and restart your game!
In the next part, we will create a fresh new mod, add our first new item to the game and slowly make our way to adding custom Pals into the game!
If you liked this post, please share it with your friends and family. If you have any comments, remarks or just feeling like sending a message, feel free to send a comment or mail!


1 Comment