Modding Terraria – Part 3 Adding a custom pet
Modding Terraria is a fun way to add and adjust features in a playful way and learn more about programming. In this part, we add a custom pet!
This post has been updated to work with tModLoader v2023.9.3.0
In this part, we will continue where we left off in the previous part. If you haven’t read that one yet, you can find it here
Custom pet in Terraria
This time, we will be creating a custom pet that will follow the player around.
Let’s get started!
Open up tModLoader and your Visual Studio project.
In previous versions of tModLoader we would be able to re-use the Items folder. While this technically still holds true, we can also keep our pet specific code contained inside a new Pets directory. So let’s create that. Inside the Pets directory, create another directory called CustomCatPet. This is where we will keep all our code for this pet.
Paste the following code inside a file called CustomCatPetItem.cs
using Microsoft.Xna.Framework;
using Terraria;
using Terraria.ID;
using Terraria.ModLoader;

namespace FirsMod.Items
{
    public class CustomCatPetItem : ModItem
	{
		public override void SetDefaults() {
			Item.CloneDefaults(ItemID.UnluckyYarn);

			Item.shoot = ModContent.ProjectileType<CustomCatPetProjectile>();
			Item.buffType = ModContent.BuffType<CustomCatPetBuff>();
		}

		public override void AddRecipes() {
			CreateRecipe()
				.AddIngredient(ItemID.DirtBlock, 10)
				.AddTile(TileID.WorkBenches)
				.Register();
		}

		public override void UseStyle(Player player, Rectangle heldItemFrame) {
			if (player.whoAmI == Main.myPlayer && player.itemTime == 0) {
				player.AddBuff(Item.buffType, 3600);
			}
		}
	}
}
For CustomCatPetItem.png we will use the following image
![]()
Looking at the code above a couple of things are worth mentioning. In the SetDefaults() method we tell our custom pet item to become a clone of the UnluckyYarn which is an already existing item. We do this so we inherit the default values and don’t have to assign them by ourselves. Since our cat will act like the one from the UnluckyYarn this is completely valid to do. After that, we declare two other variables, namely Item.shoot and Item.buffType We will be making two different files which will be the referenced values of these two lines.
Creating our buffs
Let’s continue with the Buffs file. Create both the CustomCatPetBuff.cs and CustomCatPetBuff.png
The contents of CustomCatPetBuff.cs are as followed
using Terraria;
using Terraria.ModLoader;

namespace FirsMod.Buffs
{
    public class CustomCatPetBuff : ModBuff
	{
		public override void SetStaticDefaults() {
			Main.buffNoTimeDisplay[Type] = true;
			Main.lightPet[Type] = true;
		}

		public override void Update(Player player, ref int buffIndex) {
			bool unused = false;
			player.BuffHandle_SpawnPetIfNeededAndSetTime(buffIndex, ref unused, ModContent.ProjectileType<CustomCatPetProjectile>());
		}
	}
}
For the CustomCatPetBuff.png we use the following image
![]()
Creating our pet
Our final piece of the puzzle is creating the actual pet. Let’s do this right now!
For this, we need a two new files called CustomCatPetProjectile.cs and CustomCatPetProjectile.png respectively.
Our pet is basically just a projectile hovering around us which is why we name it as such.
For CustomCatPetProjectile.cs we use the following content
using Terraria;
using Terraria.ID;
using Terraria.ModLoader;

namespace FirsMod.Projectiles
{
    public class CustomCatPetProjectile : ModProjectile
	{
		public override void SetStaticDefaults() {
			Main.projFrames[Projectile.type] = 1;
			Main.projPet[Projectile.type] = true;

			ProjectileID.Sets.CharacterPreviewAnimations[Projectile.type] = ProjectileID.Sets.SimpleLoop(0, Main.projFrames[Projectile.type], 0)
				.WithOffset(-10, -20f)
				.WithSpriteDirection(-1)
				.WithCode(DelegateMethods.CharacterPreview.Float);
		}

		public override void SetDefaults() {
			Projectile.CloneDefaults(ProjectileID.DynamiteKitten);
			AIType = ProjectileID.BlackCat;
		}

		public override bool PreAI() {
			Player player = Main.player[Projectile.owner];
			player.blackCat = false;
			return true;
		}

		public override void AI() {
			Player player = Main.player[Projectile.owner];
			if (!player.dead && player.HasBuff(ModContent.BuffType<CustomCatPetBuff>())) {
				Projectile.timeLeft = 2;
			}
		}
	}
}
And for CustomCatPetProjectile.png we use the following image
![]()
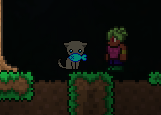
Let’s see how our mod looks in action! Build + Reload your mod and load your world up. Grab 10 pieces of dirt blocks, go to your workbench and you should see our new CustomCatPet!


2 Comments