Create a Discord bot in NodeJS
In this post we will teach you how to create a Discord bot in NodeJS.
Prerequisites
Before we have a working bot, we first need to walk through a couple of steps:
Following these easy steps will end you up with a Discord bot in no time. Let’s get started.
Step 1: Registering our bot on Discord
Open the following URL in your web browser https://discord.com/developers/applications and click on the button at the top right saying New Application.

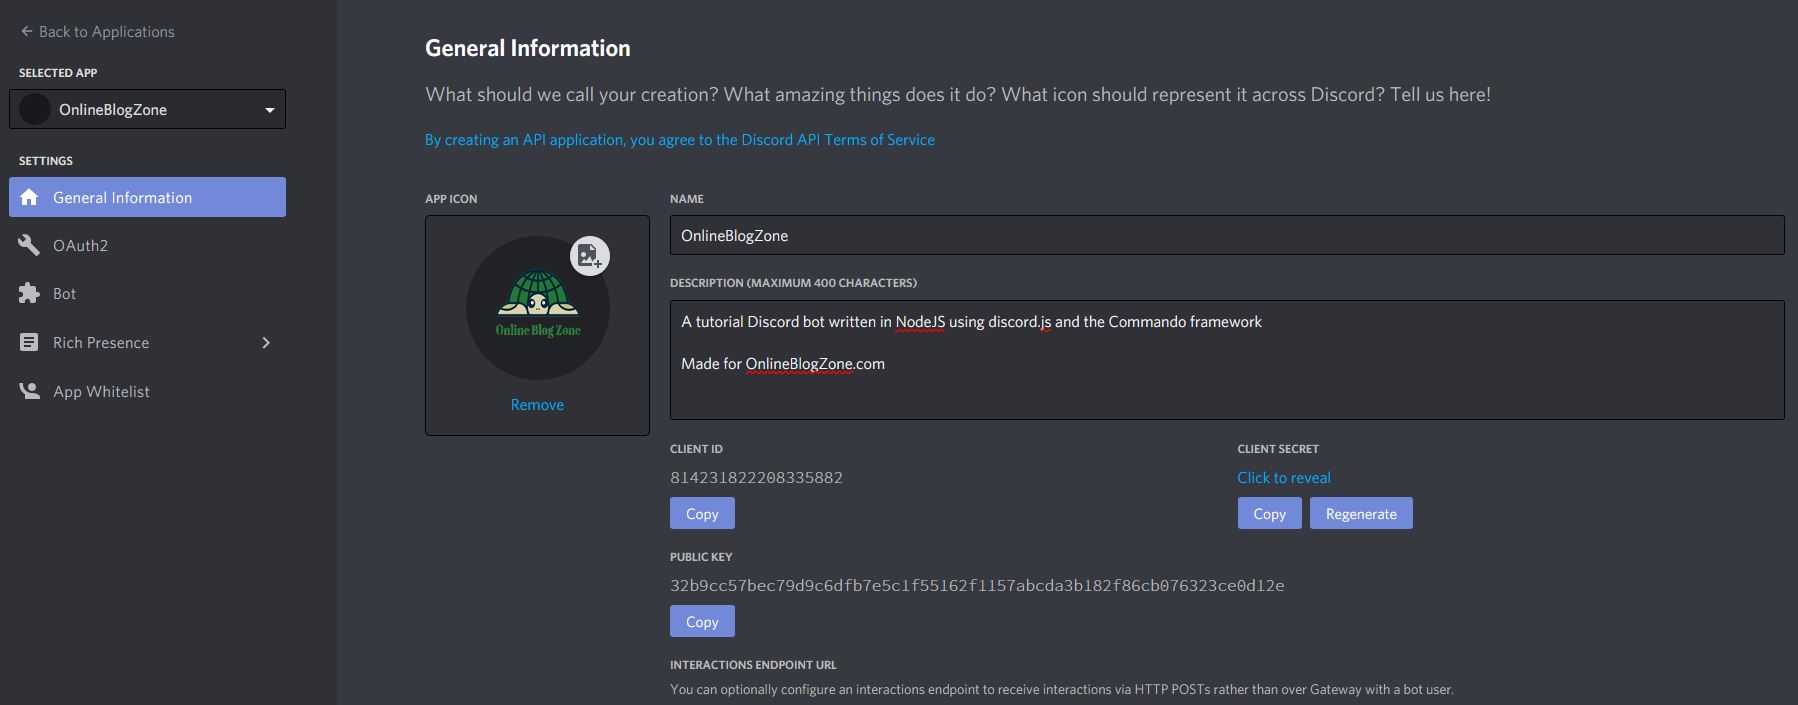
Give your application a fitting name and hit the Create button. Next, fill in the general details like the description and give your bot a fitting image
Now, move on to the Bot tab on the left and click on Add Bot. For this tutorial, we will uncheck the Public bot option but you can leave it on if you want. What this settings does is allow everyone on the internet to invite your bot to their server.
Our last step is to add the bot to our server. Move over to the OAuth2 tab and check the bot option under scopes

Copy and open the link in a new browser tab. On this page you can add the bot to your server and see it appear.

Step 2: Setting up our workspace
We assume you’ve already installed Node or NVM (Node Version Manager) on your system. If not, please follow this link on how to do so: installing NVM. While you can install NodeJS on its own, we prefer to use NVM which allows us to swap versions on the fly.
For our IDE we will be using Visual Studio Code
Create a directory somewhere on your system, for instance in your documents directory, and call it discord_bot. Next, open this folder with Visual Studio Code.
Open the built-in terminal by going to Terminal -> New Terminal. Inside this terminal type npm init -y. This set of commands will create our basic project structure.

Next, we will install the dependencies we will be using. Enter the following command npm install discord.js discord.js-commando. This will add two new lines in our package.json file under our dependencies.
We will also define two other dependencies, one to handle our Discord token which our bot needs to connect and the other to make debugging a bit easier.
Enter the following commands
npm install dotenv
npm install nodemon --save-dev
We are ready to start coding our bot now!
Step 3: Coding our bot
First things first, we need a file to hold our main bot code. Let’s create this file and call it bot.js.
Next, we need to instantiate our Bot. Add the following code to bot.js
const Commando = require('discord.js-commando');

const client = new Commando.Client({
    owner: 'YOUR_DISCORD_ID_HERE'
});
Note: you can find your discord id under the menu item ‘bot’. Here you can copy your token
Normally our commands would go in this same file but Commando provides us with a very nice structure where we can have our commands in separate files. To get this to work, update your bot.js to the following
const Commando = require('discord.js-commando');
const path = require('path');

const client = new Commando.Client({
    owner: 'YOUR_DISCORD_ID_HERE'
});

client.registry
    .registerGroups([
        ['tutorial', 'Tutorial Commands']
    ])
    .registerDefaults()
    .registerCommandsIn(path.join(__dirname, 'commands'));
What we’ve done here is define a directory called tutorial. This directory contains our tutorial commands. Commando will look for our tutorial group inside our commands directory. We don’t have this directory yet, so let’s create it.
Our current project structure should look like this

Before we get to our hello_world.js file let’s first make our bot come online. Update bot.js to contain the following
const Commando = require('discord.js-commando');
const path = require('path');
require('dotenv').config();

const client = new Commando.Client({
    owner: process.env.BOT_OWNER
});

client.registry
    .registerGroups([
        ['tutorial', 'Tutorial Commands']
    ])
    .registerDefaults()
    .registerCommandsIn(path.join(__dirname, 'commands'));

client.login(process.env.BOT_TOKEN)
We added another requirement called dotenv. This requirement lets us create a .env file and enter our sensitive data in it. Your .env should look like this
BOT_TOKEN=YOUR_LONG_BOT_TOKEN_HERE
BOT_OWNER=YOUR_DISCORD_ID_HERE
To get our bot up and running we will add two line to our package.json file. It will look like this
{
  "name": "discord_bot",
  "version": "1.0.0",
  "description": "",
  "main": "index.js",
  "scripts": {
    "start": "node bot.js",
    "debug": "nodemon bot.js",
    "test": "echo \"Error: no test specified\" && exit 1"
  },
  "keywords": [],
  "author": "",
  "license": "ISC",
  "dependencies": {
    "discord.js": "^12.5.1",
    "discord.js-commando": "^0.12.2",
    "dotenv": "^8.2.0"
  },
  "devDependencies": {
    "nodemon": "^2.0.7"
  }
}
After you’ve updated your package.json open up a terminal and run the following command npm run debug
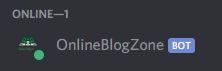
If all went well, you should see the following inside of Discord
Commando comes with a set of default commandos out of the box. In Discord try typing !help and you should receive a direct message from our bot!
Our last thing to do is to create our command, so let’s do that right now. Open up hello_world.js and add the following code
const { Command } = require('discord.js-commando');

module.exports = class HelloWorldCommand extends Command {
    constructor(client) {
      super(client, {
        name: 'helloworld',
        group: 'tutorial',
        memberName: 'helloworld',
        description: 'Display a hello world message!'
      });
    }

    async run (msg) {
        return await msg.reply('Hello!');
    }
}
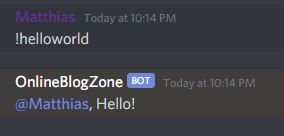
Here we create a new class called HelloWorldCommand. We make it extend the default Command which is provided to us by Commando. Every command requires a name, group and memberName. When we trigger our command we end up in the run function. For our tutorial command, we let our bot reply to our !helloworld message with Hello!
After saving our file, we can try our new command!
We’ve completed this tutorial on how to create a Discord bot in NodeJS and have added a custom command to it!